
In my workroom, I have two tables (well, I do now, anyway): one for my sewing machine, and one for my serger, with my computer monitor on the angle where the two meet in an L-shape. For over two years now, I’ve been using a hand-me-down bentwood dining chair as my sewing chair, one that wasn’t particularly pretty, but was comfortable and did the trick. It’s hard, you know, getting a chair just the right height and cushiness for your backside when you spend a large part of each day sitting down.
Inspired by the successful update of my desk organizer, I moved some things around in the room, added that second table for the serger (to get it up off the floor, where it has been living in semi-storage), and made more space for myself. When I did that, I took the matching chair to my sewing seat and placed it in front of the serger. And realized I was tired of not liking the fabric on the seat, and that it was high time I made an update. And let me tell you: night and day, y’all. Night and day.
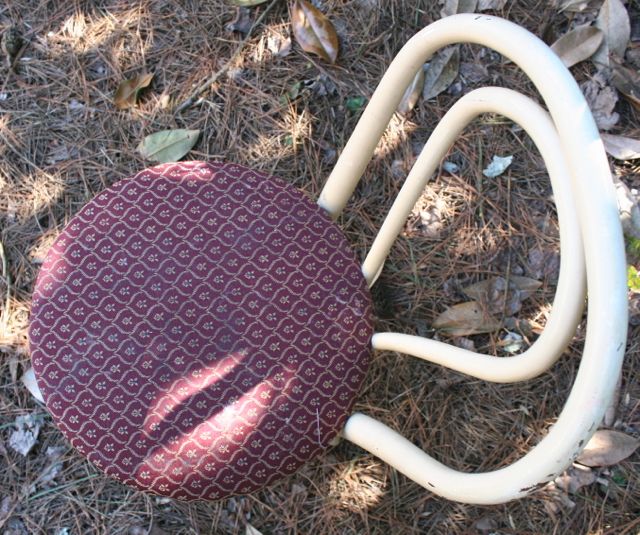
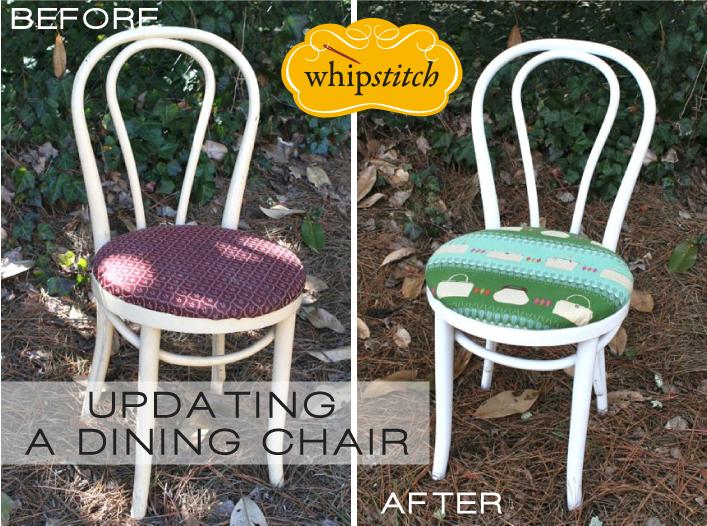
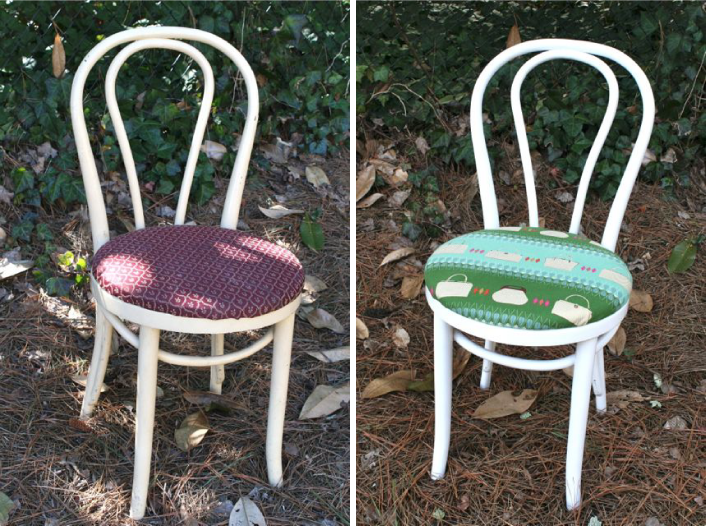
Here is where I started: a vintage bentwood dining chair, nothing fancy, just classic and simple. My mother scored this for me at a flea market? off the curb? Somewhere, back when we were living in our rental house before we bought the house we have now. It was at the folding-leaf table we used as a “dining” table in the breakfast nook in that house, where the children ate their breakfasts, and then it was moved to my sewing table when we re-located. The paint is a little worn, and the seat fabric is more than a little outdated, but it’s sturdy and strong, it’s a classic shape that will never go out of style, and it’s exactly the right height for my work table, which made it plenty good enough for me.
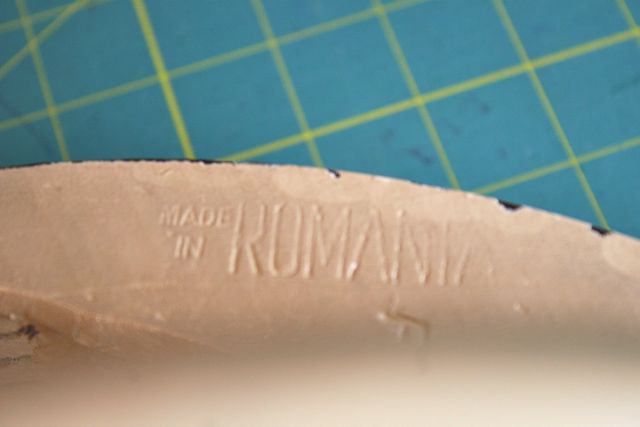
I figured, chairs that are well-made and well-proportioned will last forever, right? So I wanted to update rather than replace, by painting the body of the chair and swapping out the fabric on the seat. Because that fabric was making my eyes hurt. Every time I went in the room, really. I think chairs made in Romania are good enough for Melody Miller fabric, aren’t they?
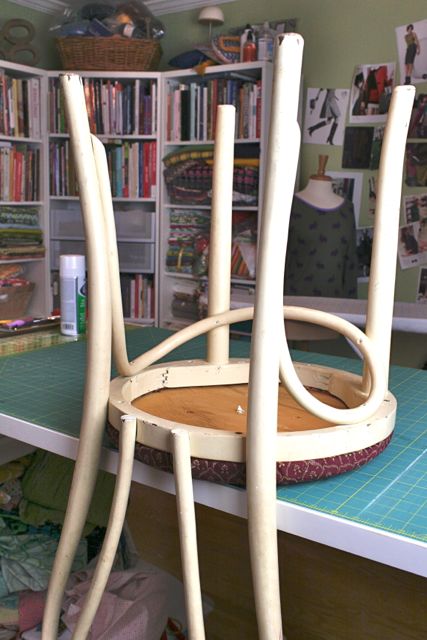
I started by flipping one of the chairs upside-down on my cutting table so I could access the seat from beneath. Chairs of this style–really any wooden chair with a fabric-covered seat attached to the base–has the seat foundation (usually a piece of plywood) held on with screws. Replacing the fabric is as simple as popping out those screws and re-covering the seat.
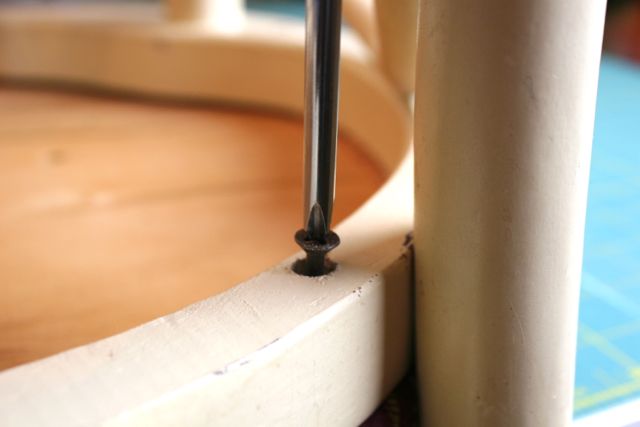
I didn’t even bother with a drill, but went straight for the Phillips head screwdriver I keep in a pencil jar on my desk. The screws all came out very easily, with almost no grunting. I put them in a little plastic box and tucked them away while I was working, so I wouldn’t accidentally knock them on the floor and have to go crawling around looking, only to learn that I could find all but one and needed to go to the hardware store for another, which would undoubtedly be hard to match, before I could finish the project. I’ve done that before, and putting the screws in a safe place while you’re working is just FUNNER.
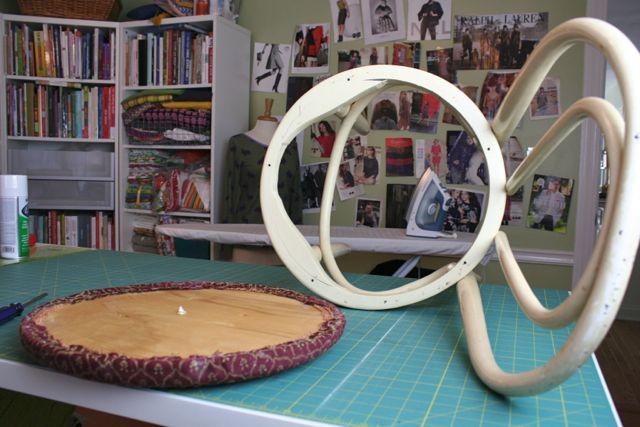
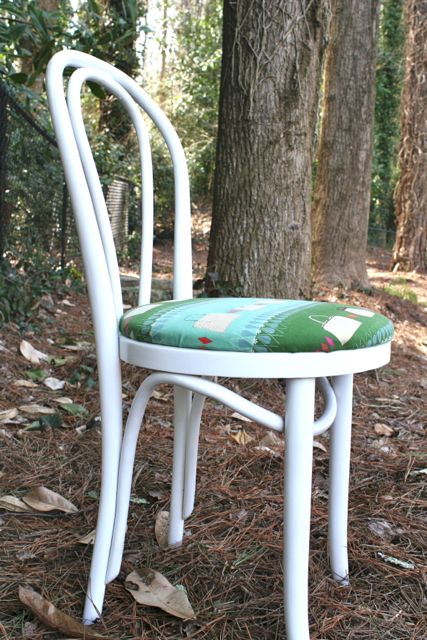
With the seat separated from the chair frame, I had two tasks: one was to re-cover the seat, and the other was to spray paint the chair frame. Spray painting is pretty straight-forward–if you want some pointers, the folks at Young House Love talk a lot about using thin, thin coats (LOTS of them) and avoiding drippies by being patient with the painting. I followed the same guidelines, and did two full cans of gloss white lacquer for these two chairs, which amounted to around seven coats of paint per chair. It sounds like a lot, but since you can re-spray after as little as five minutes with spray paint, it doesn’t actually take very long. And the smooth gloss finish is sublime.
But all that came later. First, I covered the seats.
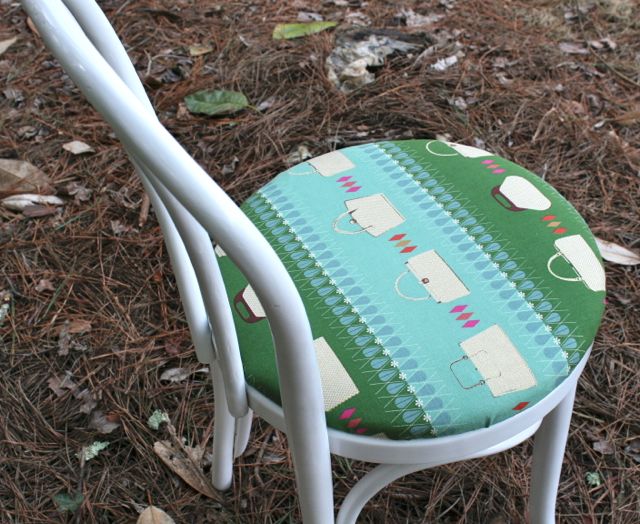
I have been saving this yard of Ruby Star Polka Dot from Melody Miller, the last collection she will do for Kokka since she’s off and running with a whole new (and very exciting) enterprise. It’s just the most lovely fabric, complete with flecks of gold metallic ink, and as soon as I placed it over the original seats to “test” it, I knew it was the perfect match (the aqua is even a dead match for the turquoise of my new Ikea Raskog cart, which is a little bonus!). I cut out a chunk for each seat, which amounted to somewhere between 1/2 and 2/3 of a yard and about 22″ wide.

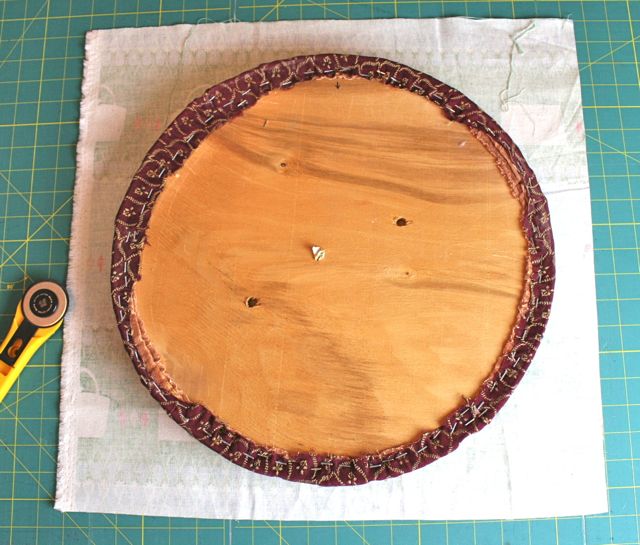
I squared one of the holes left from the screws up with the front of the fabric. This print is directional, so I wanted to be sure that the chair seat was square with the design before I started stapling things in place. Once that was done, I started working my way around the perimeter of the seat, pulling the fabric snug and stapling about 1″ from the edge. I did the north/south/east/west points first, to make sure that I had pulled the fabric equally taut in all directions, and then filled in the quadrants between those staples bit by bit. In some places I had small pleats, but I suspect it’s best to avoid those by working in tiny sections as you get all the way around the fabric.
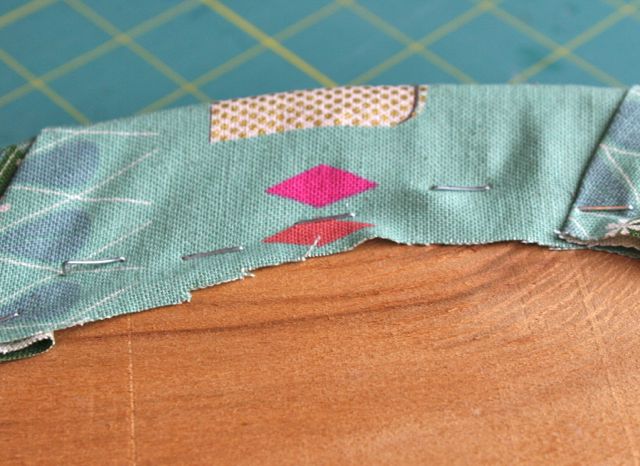
All of this was done with a standard home improvement store light duty staple gun. I used a combination of 1/4″ and 3/8″ staples, since I ran out of my first pack partway through, and can say that I recommend the 1/4″ staples for this task. See on the left above, where one of the staples isn’t fully seated? That’s because the legs of the staple were a tiny bit too long for the seat, and so the staple is slightly bent. Shorter staples will prevent that, and make the seat sit flatter on the chair frame when it’s re-attached.
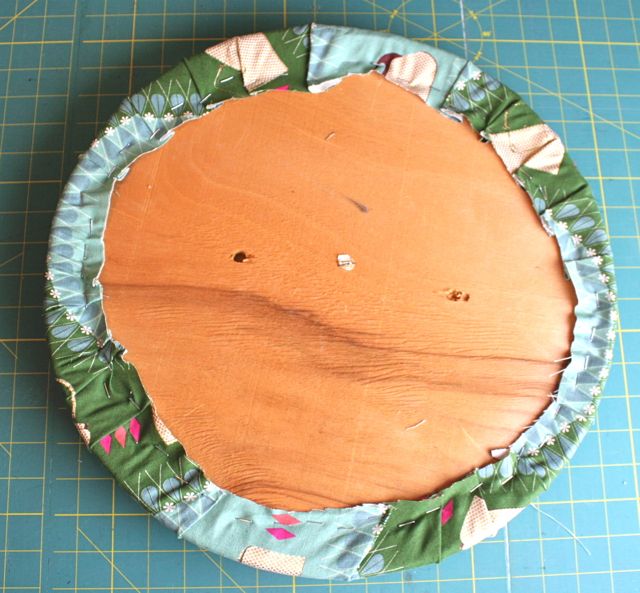
When the seat is all finished, this is what it looks like. Using a pair of applique scissors, which are bent at the handle to allow you to snip things that are hard to reach, I trimmed out all the excess fabric outside the staple line, leaving a small (3/8″ or so) allowance beyond the edges of the staples.
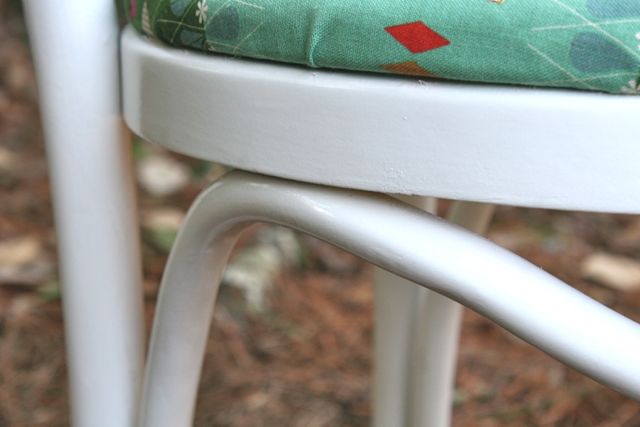
All that time, I was also going back and forth to the garage, where I was spray painting the chair frames. I used basic home improvement store lacquer, a high gloss white. I thought one can would be enough, but it wasn’t even close, and I needed a full two cans for good coverage. If the original paint had been even a little bit dark, I suspect I would have needed three, to be honest. I had to really work to get all the edges and the angles, since the bentwood design makes for a lot of curves, and I didn’t want to discover an unpainted edge later on. Since I also use these chairs near-constantly on a daily basis, I finished with a top coat of clear poly, also in a spray can. The finished version is nice and glossy, just like I was hoping!
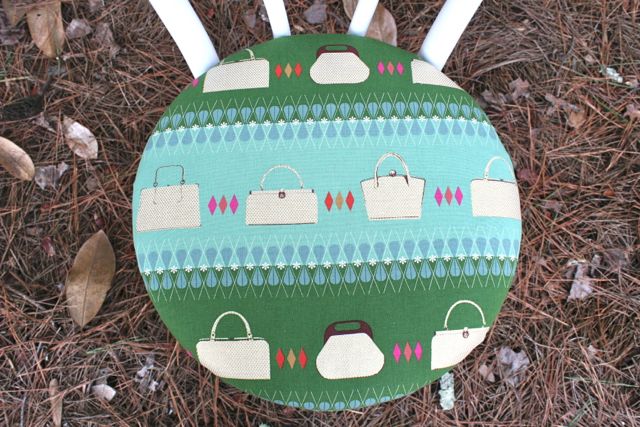
When the paint cures, you can re-attach the seat to the chair frame. Full disclosure: my paint is dry, but I don’t think it’s fully cured yet, since spray paint takes longer to dry fully in cool weather (according to the can, you should allow extra dry time for any temps below 50 degrees Fahrenheit). I’m going to give it another 48 hours to off-gas and harden in the garage before I screw the seats back on. So in these photos, the seat is just resting on the frame without being fully screwed down. But isn’t it awesome??
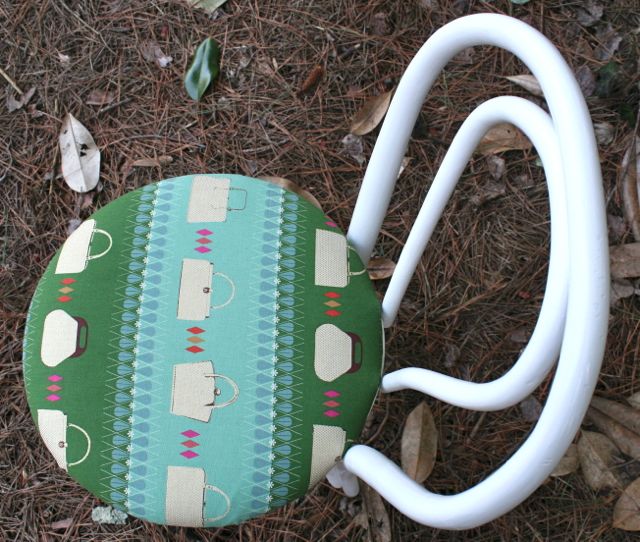
I could not be more excited it I tried. Well, OK, maybe if it was a full-sized squishy armchair covered in Melody Miller fabric–that might rock my socks off. But for these little chairs, I think this is a really pretty result, and I can’t even talk about how much brighter my work room will feel as a result of getting that icky rusty-brown fabric and the dull creamy-not-white-at-all chair frame out of there. It clashed with my Ikea table tops, and blocked my chi.
Can’t you just imagine sewing up a pretty spring dress with ruffly sleeves in this chair?? I know I can.
It astonishes me how inexpensively you can update a piece of furniture, and by doing that, freshen up a whole room. Since this is also my daily work space, it has already rejuvenated my day-to-day efficiency–yes, even before the chairs have come back in the room. A little spit and polish, and I’m inspired and ready to roll.
I hope it really comes through in these photos–that creamy color doesn’t look dark in the images, but in real life, it was totally Little House on the Prairie, and the bright white just feels so much more NOW. Huge difference to the naked eye, for real–trust me on that.
How about you? What one little project do you have lying around that you know you SHOULD get around to doing, but just haven’t yet? What’s stopping you?!? Go get ’em!
Anne
February 26, 2014 at 6:09 pmTo avoid puckering of fabric: Start with North, South, East, West **then halfway between each point** and repeat between **. You may still have very small pleats, they should be un-noticeable and even. =)
Anne
February 26, 2014 at 6:35 pmTip: If you’re not using upholstery fabric you may wish to either add fabric stabilizing interfacing(iron-on) or add a layer of clear vinyl (either glossy or matte finish).
To prevent tears in your fabric when you first sit in your lovely new chair – fit the fabric smoothly but do not pull too tight before stalling in place.
Have fun!
Deborah
February 28, 2014 at 7:04 pmThanks so much for the tips! I thought of interfacing these, but the fabric is a really substantial cotton/linen blend, and I think it will hold up well. Am excited to have the color and brightness in this room! Glad you liked! 🙂
Diane
February 28, 2014 at 10:07 amFeeling verklempt…..how fresh and modern they look! totally fit in with your (newly) near-Swedish aesthetic. I think these chairs came from Angel’s Antiques in Opelika, Alabama. They totally met the wiggle test and were part of an unmatched set of 4? 5? that I got you for your birthday that year. I find it ironic that I later got three (different) chairs from you! Congrats on the IKEA cart, I knew it was only a matter of time. Need pics of the workspace in toto!
Deborah
February 28, 2014 at 7:03 pmI really love them–and as soon as I took them out to be painted and put another chair in their place, I realized how much I dislike being at the wrong height when typing. I always crank adjustable chairs to the highest setting, and these have the seat a good 1.5″ or so higher than any other chair we have, so they’re pretty close to perfect. The fabric is just a bonus! 🙂
Sewing Studio Tour | Whipstitch
March 7, 2014 at 8:37 am[…] want to weep with joy. The color: perfectly suited to my palette–and a flawless match to my newly-painted and recovered work chairs. The size: exactly suited for the nested fabric baskets where I keep my hand-sewn projects. The […]