I’ve had some questions about how to create the continuous bias tape for the piping I mentioned in my last post. I’m re-posting a tutorial I put together last October for my other blog, Pretty Jane.
My students in the Intro Sewing class all make continuous bias tape. I make it right along with them each month, and give them a copy of printed instructions courtesy of the Dread Pirate Rogers, but have always wanted to have better photos to offer. While I was busy making the changing pad cover for New Baby, I went ahead and shot some photos of the CBT process with the gingham I used to wrap the piping.
Bias tape, very simply, is just a strip of fabric cut on the bias–the 45 degree angle across the grainline of the fabric. It has the most give you can get out of a particular cut of fabric, and allows you to bind curves and seams, wrap piping, or edge finish a project. It’s great stuff, I use it all the time, and knowing how to make and apply it will revolutionize your sewing–honest.
You can easily make bias stips just by slicing across that bias line. This is the technique I use when binding armholes or necklines, something relatively short. When I need longer pieces, though, I’d be forced to stitch each of those strips together into one longer strip, and that’s a huge pain in the behind, as far as I’m concerned. It’s much easier to make CBT–Continuous Bias Tape–by stitching a larger piece of fabric together on the bias and then cutting THAT into strips. You get piles and piles of bias tape this way, and you get the freedom to choose any fabric you want rather than being limited to the solid, poly-cotton blend available at the fabric stores. You can also manipulate the width of the bias tape better–I’ll elaborate on that at the end of the post.
So, how do we make CBT? Golly, I’m glad you asked.
Here we go:

Cut off a length of your fabric. How much depends on how long you want your finished bias tape to be, but if you’ve never done this before, I’d start with about half a yard–that measurement seems to make a piece that’s easy to manipulate without being overwhelming:
 Trim off the selvedges of your fabric. (Selvedge edges shrink at a different rate than the remainder of your fabric, and should always be removed–even if it feels like a huge waste of a straight edge!).
 Fold one selvedge over to meet the top edge of your fabric, forming a 45 degree angle on one end, and a triangle on top of the main portion of your fabric:
 Trim this triangle away by placing your blade along the folded edge and cutting:
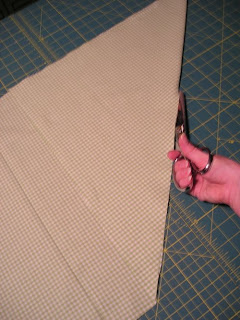 You should end up with two pieces of fabric, like this:
 Move the triangle to the OTHER end of the original piece of fabric, placing selvedge edge to selvedge edge. You’ll know you got it right if your shape is now a parallelogram rather than a rectangle:
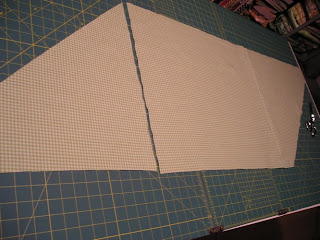 Place the triangle and the original fabric right sides together, selvedges touching:
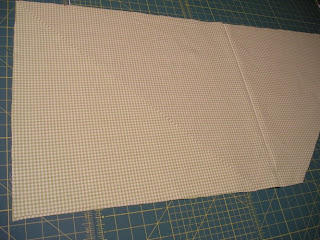 Stitch a seam along the selvedge edge. I use the edge of my presser foot as a seam allowance guide (most presser feet are approximately 1/4″ away from the needle, giving you a 1/4″ seam allowance), but you can use whatever seam allowance you choose–just remember what it was so you can give the next seam the same allowance:
 Press your seams allowances open (and consider if it’s time for a new ironing board cover–oh my!):
 You should now have a piece of fabric that looks more or less like this:
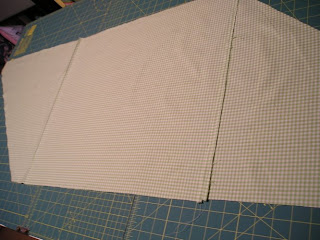 Starting at one angled edge on the WRONG SIDE of the fabric, begin drawing lines parallel to the bias angle and marching across the fabric. I use a quilting chalk for this, but whatever marking tool you prefer is fine. I space my lines with a quilting ruler, too, since it’s clear and acrylic and sticky on the bottom, making my marks more consistent–and consistency is the KEY with this step. It doesn’t have to be perfect, but the closer it is the easier the next steps will be:
 How far apart you space the lines is dependent on how fat you want your bias strips to be. If you’ve not done this before, may I suggest that FATTER IS BETTER to begin with–you can always scale it down when you feel more confident with the technique. For this example (and to wrap the huge, fat piping in my project) I used the width of my ruler as a guide:
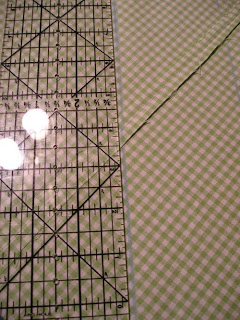 At the other end of your fabric, you may not have a full width left, like I had in this example. Cut that paltry little vestige off to make sure each of your strips is of equal size:
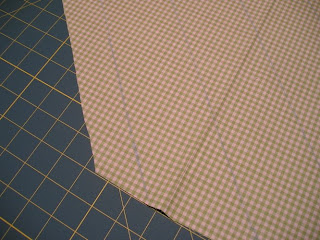 OK, here comes the confusing part, at least for most people. Our goal is to create a TUBE of fabric, then cut that tube apart to make a long strip. We DO NOT want to stitch a tube, then cut it apart into a series of donuts, so the edge that we stitch needs to be slightly offset. In order to achieve this, we’re going to number the lines we just drew, starting at the edge with number ZERO, and moving across each line sequentially (the first chalk line is ONE, the second is TWO, etc):
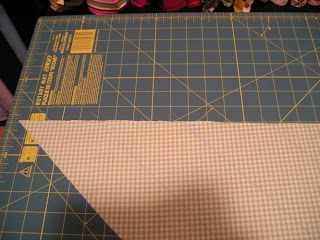 On the BOTTOM of the fabric, we number again, but this time, we start with number ONE at the edge, and the first chalk line is TWO and the second is THREE… The point here is that the TOP of one chalk line never has the same number as the BOTTOM of the same chalk line (the printed instructions have a good illustration of this):
 Once all the lines have been numbered, bring the two straight edges (i.e. the top and bottom of your piece of fabric, NOT the bias edges) together, right sides together. We’re going to match the numbered lines to one another–line #1 meets line #1, line #2 meets line #2, etc. Pin these in place. This step feels AWKWARD, as it makes a twisted tube of fabric–that’s OK, since we WANT it to be offset:
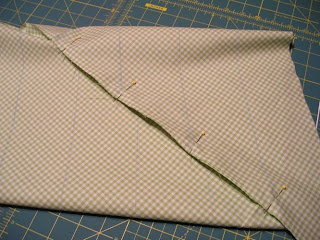 Bear in mind that as you match these lines up, they’re at an angle, so they won’t match one another on either side of the fabric–they’ll actually cross one another. You’re going to put in a seam that will run through the point at which they cross. Just keep pinning and matching the best you can–it’s much more important that your seam lies flat than that your numbers and lines match flawlessly. You should end up with something hopeless that looks like this, and will almost certainly be thinking, “This lady is nuts, and this is never gonna work.” Hang in there!
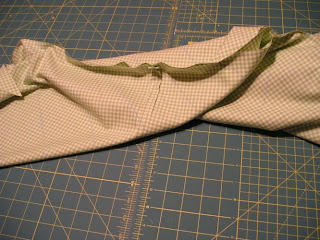 Take your twisted tube to the machine, and stitch a seam with the SAME ALLOWANCE as the last seam you stitched, whatever that was. Remember to keep reaching beneath your work and making sure that there are no catches or random bits of fabric getting caught under the needle–you really don’t want to have to do this step over:
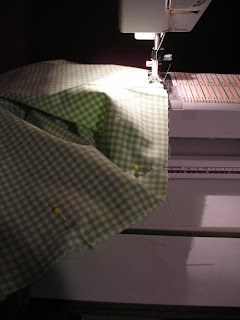 Press that awkward seam open. A sleeve board is great for this, but an ugly, stained ironing board will work, too (note to self: make new ironing board cover):
 OK, this is where the magic happens. At each end of your tube, you have a little tail of fabric hanging off. You also now have a SINGLE line of chalk going around and around the fabric. Choose one end of the tube–doesn’t matter which one–and begin cutting the line next to that little tail:
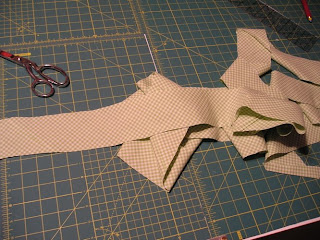
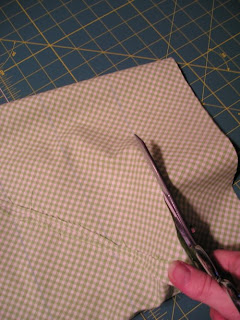 KEEP CUTTING all the way around, through a single layer of fabric, and watch as the tape begins to take form:
 When you come to one of your seams that you’ve pressed open, cut right across it and keep going:
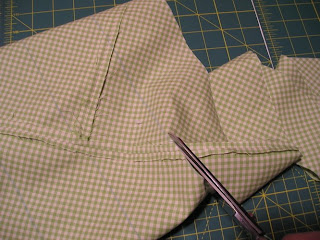 Ta da! The finished product: yards and yards of bias tape from your favorite fabric. I make lots of this at one time when I have the time, then store the rest for the NEXT project. That way, I get the enjoyment of it and I use my time economically:
 Hope the images helped, and that the length of the instructions doesn’t intimidate–the first time can be a rough road, especially if you’re teaching yourself, but after that it’s SUCH a quick, simple process that I know you’ll make it a regular part of your sewing skill set.
Previously posted on Pretty Jane, October 2008


noolygirl
March 11, 2009 at 6:34 amHI!
Great tutorial! can’t wait to try it…
the Dread Pirate link wouldnt open for me. Any suggestions?
thanks,
Yael
Pretty Jane
March 11, 2009 at 9:43 amOops! Thanks for catching that, Yael! I’ve updated the link and gotten it working now. All better then.
Sewing Geek
March 19, 2009 at 2:00 pmMore people need to see this post! It’s fantastic! This is how I make binding but you have explained it far better than most. However, I do use a square and you are right, I am not going to start using a rectangle, thanks!
JodieMo
April 24, 2009 at 10:40 amThis sounds fascinating. I hate making binding and to be able to make a bunch in one go would be worth while! If you don’t mind I would like to link to this tutorial on my blog.Thanks so much!
Anonymous
June 15, 2009 at 6:12 pmGreat tutorial, and I'm going to try it right away. I make a lot of dresses for my daughter, and my favorite pattern rquires quite a bit of bias tape. How wonderful to be able to make it! One question though…when you rolled the fabric off the bolt, and cut off the corner, is the fabric folded in half lengthwise? Or do you use the fabric without it being folded? Thanks so much!
barson
July 14, 2009 at 7:02 pmHooray! You helped me have yards of yellow with white dots bias tape. The pics and instructions made all the difference for me!
star.originals.upcycling
November 9, 2009 at 10:35 amWOW – that was so simply explained! I will be making some bias tap in the VERY near future!! THANK YOU!!!
India Richards
November 21, 2009 at 9:13 amThanks for the tutorial! I think I'm going to give it a try soon. Would you recommend a certain kind of fabric? Does any cotton quilting fabric work? I'm planning to use it around oval placemats and I wanted to make sure it would conform to the rounded edges well enough. Thanks so much!
Super Big Announcement | Whipstitch
April 27, 2010 at 2:29 pm[…] things I’ve ever had the privilege to accomplish. So when I blogged a tutorial for making Continuous Bias Tape, I didn’t really think much of it, beyond that it was an extension of my classes and that the […]
Mary Kay
May 6, 2010 at 1:50 pmOk, this is amazing! My daughter in law just told me about doing it this way. Tried it tonight and I’m hooked! SOOO much better than sewing all those little ends together and pressing them individually!
Thanks for such clear directions
♥ MK ‘GenevaDesigns’
Showdown: Bias Tape vs Cross-Cut Fabric — Whipstitch
July 8, 2010 at 3:22 pm[…] obsessive love for bias tape is widely known. I love teaching folks how to make continuous bias tape, and I love finding new projects where I can apply it and exploit its unique characteristics. I […]
Sewing Quiz: WINNERS — Whipstitch
August 3, 2010 at 10:16 pm[…] True or False: Bias tape is a heat-activated adhesive used to hold a hem in place while stitching. It is removed either by laundering or with a spray bottle of water. Totally false. I have a personal affinity for bias tape–find out all about it here. […]
birthday bunting | Biscuits and Bobbins
August 18, 2010 at 12:34 am[…] I was making the continuous bias tape I was surprised how much you get from such a small piece of fabric. Out of a 1/2 yard of fabric, […]
Kim @ Cheap Chic Home
January 13, 2011 at 12:41 pmI’m so glad I found your instructions–I was just starting to make some (bias tape) and found my printed directions were lost somewhere in my sewing cave! Blessings, Kim
Ally T
June 11, 2011 at 8:44 pmExcellent instructions! I made some bias tape – enough so that I thought I wouldn’t get to the end of it!
Thanks for the tutorial.
Carissa
September 27, 2011 at 12:16 pmI don’t suppose there is a video of this anywhere???
Deborah
September 28, 2011 at 7:51 pmNot currently, but what a great suggestion! I’ll have to add that to the list of things to make sooner rather than later. Might be helpful for a lot of folks!
Lynn
October 16, 2012 at 2:58 amA video would be so helpful! I’m a newbie teaching myself with the aid of your awesome book. I absolutely love the book but I’m having a tough time figuring out exactly what I’m aiming for (right in that spot where you say here’s where it can get confusing) The picture shows the numbers lined up but then I see here on this tutorial they are offset. A video here would be perfect.
Jan
January 6, 2014 at 12:33 pmjust ran across your comment about video,,,I have found this on YouTube, it is from Missouri Quilt Co and the video name is Continuous bias binding. I have found this really helpful, enjoy
CharliAnn Olney
January 31, 2012 at 5:18 pmI did this technique once, long ago. It was in a pattern that required yards and YARDS of bias tubing. Then, I didn’t have the pattern any more, so lost the instructions. Am so glad to have found your clearly written instructions as it is so much fun to have your own bias tape!
Deborah
February 1, 2012 at 7:52 pmI’m so pleased they’re helpful to you! I feel like once you do it one or two times, you really can make bias tape super fast–and since I’m a major geek, that’s a ton of fun for me. 🙂
Becky
February 12, 2012 at 4:06 pmGreat tutorial, Deborah. I’ve been sewing 40+ years and this is the clearest set of instructions for this method I have found! One added tip I discovered: Place a narrow cutting mat (mine is 18 x 24) on the ironing board and it’s easy to use the rotary cutter without fear of accidentally cutting through the bottom layer.
Thanks so much for your helpful lesson!!
Cheryl
January 1, 2013 at 12:51 pmthanks so much for making a difficult sounding process so easy! The pictures were a great help as I had to keep referring to them during the process of making the binding.
Tonni Brill
January 15, 2013 at 8:24 amI love it. You just made me one step closer to finishing projects and getting them listed on my etsy account. It took me a couple of tries lining up, but now I just take a few more minutes pinning it correctly and shazam! Thanks for the tip!
Mary
March 10, 2013 at 9:47 pmI need to read this tutorial a couple of times to get it, I am better at actually seeing….you wouldn’t happen to make any videos would you? . :D. …..just asking 😉
Deborah
March 11, 2013 at 11:22 amHi, Mary! There IS video of this technique as part of my Essential Sewing e-course–along with 30 more lessons. The link is here if you’d like to learn more: http://whipstitchfabrics.com/blog/e-courses/ Hope that helps! 🙂
Evelyn
April 16, 2013 at 3:56 pmI have worked several hours trying to make a continuous bias strip from a printed quilting chart without success. The pictures didn’t make sense to me but I did follow directions. Your do appear to be something I can understand. I need several long strips of contrasting fabric to go on the bottom of a childs dress.Thanks so much for your tutorial.
Baby Bib Give Away!!!!! | Life on the (Clothes) Line
May 6, 2013 at 8:29 am[…] out how to make the tape. To get the most tape out of a yard of fabric, I used this tutorial at Whipstitch Fabrics to cut the fabric on an angle and then sew it to the other side – so the entire yard of fabric […]
Tiny Sewists: Teaching Kids to Sew :: Lesson 9, Project 2, Continued |
April 29, 2014 at 9:02 am[…] Kitty Toddler Sleeping Bag last year. I made it following a fabulous tutorial by Whipstitch to make loads of bias using the continuous bias tape. For this project you won’t […]
Rebecca
July 18, 2014 at 10:13 pmThank you! Great tutorial and I’ve successfully made heaps of bias tape for my cushions! Some of the photos warp the shapes a little bit due to perspective but the tutorial works a treat!
A hand-cut chenille blanket: Tips from a newbie | Crafty Green Rabbit
August 18, 2014 at 4:55 pm[…] made my own bias tape (tutorial) and ironed the initial folds using the pin […]