My girls wear a lot of skirts. They’re easy to put on, comfortable to play in, and a great way to use up and show off small amounts of fabric that I really, really love. Add an inexpensive t-shirt from Target, and you’ve got outfits all week long. You probably even have all the supplies on hand:
- 1/2-1 yd of quilt-weight cotton fabric
- 1 yd 3/4″ elastic (I like the knit non-roll elastic)
- matching thread
Not only is this skirt super quick to put together, but it only requires less than a yard of fabric, making it a fantastic stash-buster. And since the measurements are fairly loose, it can be a fantastic gift item for all those birthdays and holidays. Nearly a perfect project, for any skill level! BONUS: As we go along, I’ve included additional instructions for those of you who’ll be using a serger, or who’ve just gotten one and are wondering when and where to serge. Yippee!
 Lay out a half yard of fabric. Prewashing is always strongly encouraged. Trim the length of the fabric based on the height of your child. Our girl is pretty average in height for a 3-year-old, so I cut this to 15″–the length I wanted the finished skirt to be (13″, long enough to end right at her kneecap) plus 1″ for the waistband and 1″ for the hem. (You can find a great guide to skirt lengths here–but do keep in mind the lengths on these charts don’t include hem and waistband allowances, so add 2″-3″ to account for those.)
For sizes over 4T, I will suggest using two “panels” of fabric to give you more fullness in the skirt. To use a second panel, cut your fabric to length, then cut another piece of fabric the same size. Follow the instructions below for sewing, but make TWO seams–one on each side, connecting the two panels to one another–rather than a single seam at the back. Using this adjustment, you can make skirts all the way up to girls’ size 12!
 Remove your selvedges! Selvedges shrink at a different rate than the rest of your fabric, so even if you’ve prewashed, it’s always wisest to either remove the selvedges or cut around them.

Fold fabric right sides together, matching raw edges along the former selvedges. Stitch a seam using your presser foot as a seam guide, giving you approximately a 1/4″ seam allowance.
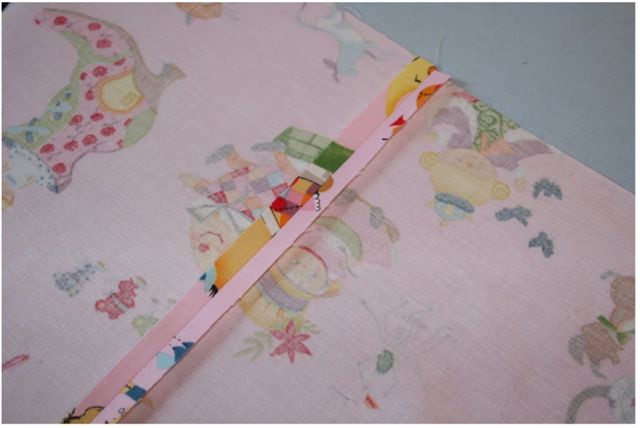
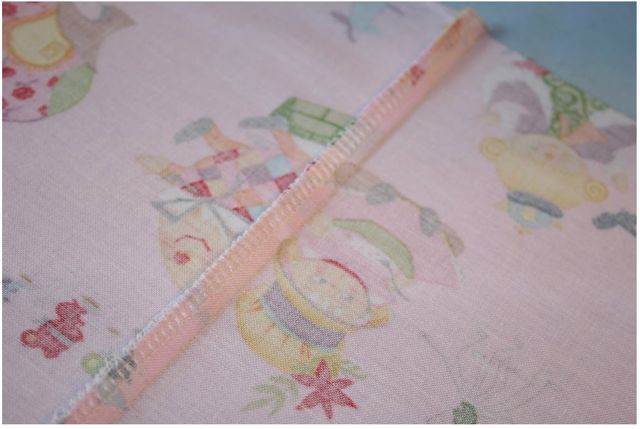
Press your seam allowances open. You now have a tube of fabric with a single seam.
(If you’re using a serger, rather than pressing your seam allowances open, serge the seam and press the serged seam allowance to one side.)
To create the casing for the waistband elastic, first fold over the upper edge about 1/4″ (but remember that the measurement is pretty flexible–just fold over a little bit, OK?). Press that in place at the iron.

Then fold over again, making a casing the same size as the elastic you’ll use. In this example, I’m using 3/4″ elastic, so I folded over a teensy bit more than 3/4″ to give myself some wiggle room.
Stitch very close to the folded edge to create the casing, but leave an opening where the elastic will be inserted (skip past all the serger instructions for an image of that–it’s three or four pictures down).
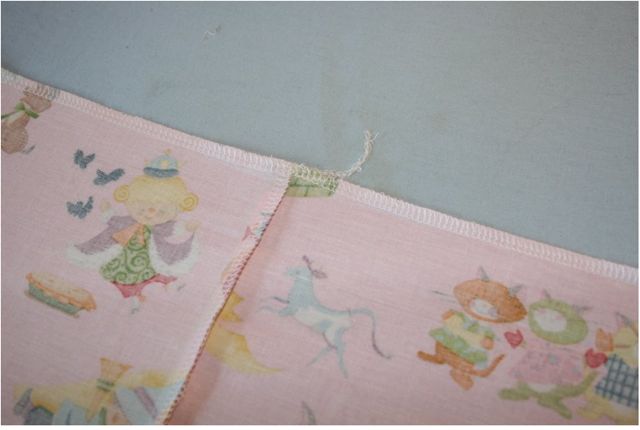
(If you’re using a serger, you can skip all the folding and pressing. Just serge all the way around the upper edge of the tube, running back over the first stitches at the end and chaining off.)
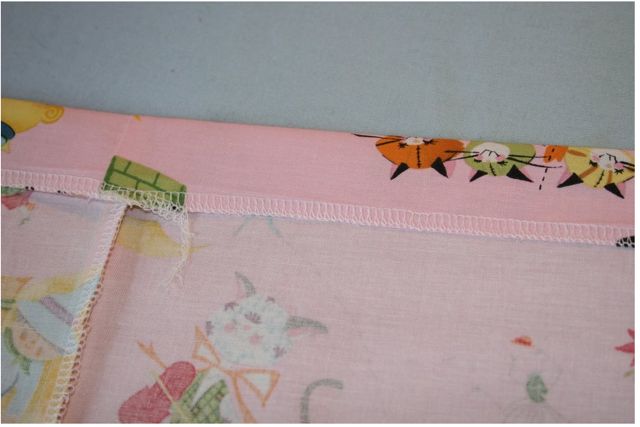
(With a serged edge, fold over to a depth equal to the width of your elastic, plus a little–here, I’ve folded over an inch.)
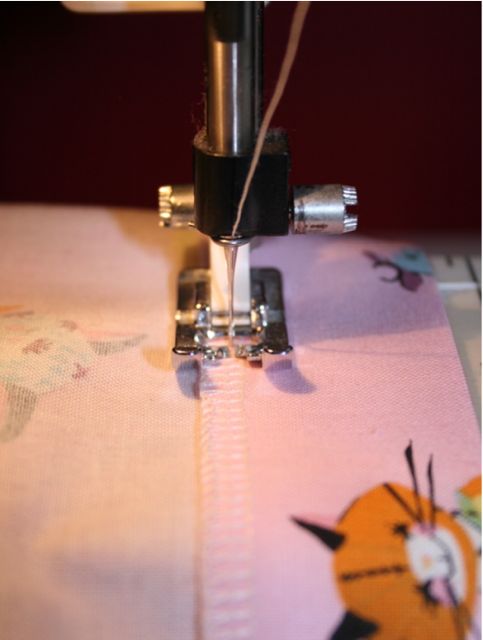
(Stitch your casing down right on top of those serged stitches.)

When you get almost back to where you started stitching that casing down, leave an opening where you’ll insert your elastic–it doesn’t need to be huge, just about 1.5 fingers wide. Be sure to backtack on either end of this opening–you’ll want it strong enough to withstand putting elastic in later.

At this point, I go ahead and stitch the hem. I think it’s a ton easier to do it here than to do it after the elastic has been installed and the skirt is all gathered up. Create the hem almost identically to the casing for the waistband: start by folding over 1/4″ on the lower edge of the tube you’ve created, opposite the casing you’ve made for the elastic.

Then fold another 3/4″ to create a 1″ hem. Press in place, nice and crisp. (Now, I should point out that you can totally create the hem on the serger the exact same way you did the waistband: serge the edge, then stitch over the serged stitches on your machine. But I think the folded-and-stitched edge on the inside of the hem looks nicer, don’t you? Choose the one you prefer, and go with that.) Because this skirt is technically a dirndl–a large rectangle of fabric that has been gathered to a waistband–there are no curves at the lower edge, which makes it easy to form a hem as deep as you’d like. If you want to build in some growing room, simply add more length when cutting, and then fold up 2″-3″ for a deeper hem that can be let out later.

Stitch super close to the folded edge.

When you get back to where you started, stitch right back over where you began and backtack. Your hem is done! Easy, huh?

OK, now we put in the waistband elastic. First, cut a length of elastic the same measurement as your child’s waistline. This gives you an extra inch for overlap when we stitch it closed, plus just the right amount of stretch (without squeezing little tummies). Again, this chart gives you some great measurements for when you don’t have a convenient child near-by to measure.

Find the biggest safety pin you have. Most times, I use a diaper pin, but today I found a giant gold-toned one in the pin cushion–no idea where that came from, but gift horses, right?

Place the safety pin into the opening you left when you stitched the casing.

Pull the pin through, and the elastic will follow behind.

Push the safety pin along, allowing the casing fabric to bunch up as you go. (Note to self: get a manicure!)
Once you’ve got a big ol’ bubble of fabric bunched up behind the pin, pull it on out, holding the pin in place by pinching it through the fabric. Keep going all the way around the casing–your goal is to bring the pin out the other side, and drag the elastic with it.
 Try this little trick: to prevent the other end of the elastic from being sucked into the casing, as well, use a second (smaller) safety pin to anchor it to the seam on the outside of the casing.

Eventually, your safety pin will come out the other side of the opening in the casing. Jubilee!

Pull out enough elastic on either end to work with it. Overlap the two ends by about 1″ and pinch them together.

Stitch the two ends together forward and backward, about 3-4 times to get a good anchor going. You’ll want it strong!

Once the two ends are secure, you’ll have a loop of elastic outside the opening in the casing.

Pull the loop to the inside of the casing.

Stitch the opening closed, just that one little bit. Trim all your threads, both here and at the hem.

I like to add one final step: I stitch through the elastic at the side seams to prevent it from shifting and rolling over. I really, really hate it when the elastic gets all twisted inside the casing, mostly because it’s super uncomfortable. In this skirt, with its one seam, I make that one seam a side seam, and stitch forward and backward through the elastic there, 3-4 times, just like when I joined the elastic ends. I do the same thing at the other side, directly across from the seam, after I’ve stretched the skirt out and evenly distributed the volume of the gathers. Perfect, no-shifting waistband!

And this, 20 minutes later, is the finished product.

A sweet, simple skirt that is totally adaptable and embellishable (if that’s a word). Imagine it with pockets, or rick rack, or a contrast hem! So easy, so quick. Now, before you get all, “Sure, 20 minutes for you, but not for me!” I’ll grant it might not take 20 minutes the first time. But so many things in sewing are like a parabola: they get closer and closer to zero each time you do them (but never reach it). So maybe the very first time you do this it takes an hour. But the next time? It’ll take half that. And the next time, you’ll shave off a few more minutes, and on and on. It’ll never happen instantly, but the more you do it, the more quickly you’ll get it done. I believe in you!



Rebecca
August 17, 2009 at 7:02 amThank you SO MUCH for thit tutorial!!! I made my first skirt yesterday! My 4-year old loves her new Dora skirt!! It took me closer to an hour, but I know the time will get quicker with each skirt I make! Thank you!!
Breanne
August 18, 2009 at 10:09 amThanks for posting pictures! I've got my fabric in the wash right now!! I'm excited to get going on the skirt. I'll be making alot, since my daughter LIVES in skirts 🙂
radhi
August 18, 2009 at 5:40 pmhi deobrah, hope you're doing well. thank you SO SO much for your blog and this sweet tutorial! it was perfect for a little confidence boost with a giddy smile from my niece to boot!
luvinthemommyhood
August 19, 2009 at 9:35 amHi Deborah!
LOVE IT! I added you to our link luv roundup today!
http://www.luvinthemommyhood.com/2009/08/link-luv-roundup_19.html
Thanks for a great refashion!
Deborah
August 19, 2009 at 9:50 amThanks so much, ladies! It's so great to have an easy pattern in your back pocket you can crank out at a moment's notice, isn't it? I'm delighted you all enjoyed it, and would love to see everyone's creations!
Jennifer
August 19, 2009 at 12:49 pmHi Deb!
This is Jennifer, Jamie R's friend. I read through your skirt tutorial and at first I thought that there was no way that I could do it. I haven't touched a sewing machine in 3 years, but during a bout of insomnia last night, I came across your website and was inspired to get reaquainted with the old dusty machine. By the time I woke up this morning I had decided that I would try to make the skirt.
I made it for my 16 month old daughter (I have NEVER made a piece of clothing before). It only took about an hour. What a sense of satisfaction, confidence, and beauty this skirt has brought into my life – and my family's life.
It is SOOO adorable…I'm going to make one for my niece and make one for a friends daughter. Thank you so, so much for this tutorial. I hope you have more easy sew tutorials like this one because I don't know what to do next!!! The pictures for the tutorial were awesome and I just can't thank you enough!!!
🙂 Jennifer
Edris
March 20, 2010 at 9:53 pmThanks for the super-easy and quick project. I need to make something for a friend’s daughter and I think this would be perfect! I have way to much fabric but when I reduce I will be sure to check out your shop. I live in Atlanta and I have checked out your etsy shop to drool over the fabric. I think I would lose my mind if I entered your bricks and mortar.
Learn From A Pro: Deborah of Whipstitch | Simply Modern Mom
May 20, 2010 at 9:03 am[…] it bother me enough to take it out and do it over?” Compare that to, “I’m making a 20-minute skirt for my 18-month-old to wear on playdates at the park, and I’ve put in an uneven hem. Does it […]
Favorite Tutorials ~ Clothes for Girls « Sew,Mama,Sew! Blog
August 18, 2010 at 2:04 am[…] 20 Minute Skirt by Deborah from Whipstitch […]
Cynthia
September 2, 2010 at 9:05 amIt’s so cute! Thank u so much for the tuto!
createdbyKay
September 3, 2010 at 12:34 amThank you so much for the tutorial! I just made one in a cute yellow print with orange dragonflies all over it! I did have one question tho. How wide should the fabric be? I did what a different site suggested of messuring the waist and multiplying that by 1.5. So it turned out really cute but i was wondering if you made it wider?
Deborah
September 3, 2010 at 2:10 pmKay–
I use the full 45″ width, which makes a kind of squared-off shape. You could certainly use less, or you could A-line the side seam to reduce the width at the waistline but keep a full skirt. Hope that helps!
What Can You Accomplish in 20 Minutes? : Sprout Reviews
October 1, 2010 at 9:34 am[…] some heavier fabrics for fall. Pair this skirt with tights and you’re all set to go! This 20-minute skirt tutorial comes to you from Whipstitch Modern Sewing. They have a great selection of tutorials, patterns, and […]
Appealing for your Assistance! — Whipstitch
October 20, 2010 at 12:48 pm[…] I considered just a top, too, maybe a button-up blouse? She’s got a zillion little 20-minute skirts, and I run into the same tee shirt issue there, so not sure that’s the way to go, either. […]
Kathleen
November 4, 2010 at 2:42 pmWOW!! This is WONDERFUL!! [Where have you been all my life??]
Many, many thanks!
Bonnie
March 3, 2011 at 9:48 pmSometimes simple is inspiring and in this case it was so that! In 20 min I now have the cutesy little skirt for my 13 month old. I even out lace and ribbon on the hem and that added such a cute touch. Thanks for the great tutorial and the inspiration.
Francine
March 17, 2011 at 10:06 pmI wish I had read thru the comments before I started. I was thinking, “a half yard? That’s 18” and I proceeded from there to make a very narrow hemmed tube. Thank goodness I stopped before actually putting the elastic in. DUH lol
Tamara
May 9, 2011 at 4:39 pmThank you for sharing this wonderful step by step tutorial. I am going to be trying this out tonight!
Lara
October 23, 2011 at 6:33 amCompleted my 1st skirt yesterday but… like Francine, I used half a yard of fabric for the width, and my skirt is too narrow for my 3 year old 🙁
In any case, I am very proud of my little piece of work!
It must be bc I am foreign and metric 🙂
I’ll try again as soon as I get some nice fabric !
Holly
July 14, 2012 at 1:46 pmWow this is such a wonderful skirt and thank you for the great words of encouragement! Very well done!! 🙂 🙂 I’m excited to try my first one! xo Holly
elisha
July 15, 2012 at 8:53 pmjust enquiry.. what fabric did you use, its so adorable!
Christy
August 4, 2012 at 5:54 pmAny instruction on how to add the contract hem by chance? 🙂 Please. I just bought my first sewing machine and finally got it threaded. Now I want to whip up one of these simple skirts, but w/contrasting hem. Thanks soooooo much!!!
Het 180-minuten rokje |
August 19, 2012 at 3:11 am[…] Nope! Niet nodig. Volgens deze 20-minute-skirt tutorial zou ik in 20 minuten een rokje klaar hebben zonder patroon. Gewoon lap stof – de volle 140cm […]
Astrid
March 24, 2013 at 9:11 amWow – best sewing tutorial ever for a beginner sewer like me who usually struggles to follow this kind of thing! It actually did only take me 20-30 minutes. My daughter’s skirt turned out beautifully… Now I just hope I got the measurements right! Thank you! 🙂
Natasha Rodricks-Naidu
April 5, 2013 at 6:14 amAn excellent tutorial. Just the motivation I need to get out my sewing machine and make something for my almost 5 yr old.
I tried a summer dress twice and buggered both of them terribly. I hope third time’s a charm.
I like your attention to detail and the clear photographs. God bless and wish me luck.
Love from India.
Cara
May 10, 2013 at 3:44 pmI made this skirt for my tall seven-year-old daughter last night and it was the first-ever piece of clothing I’ve made. It turned out great and I had no problems following the instructions. Probably would have taken me 20-30 minutes if I hadn’t spent so long ironing, measuring and cutting in an effort to get it just right! The two seams at either side worked well. I added a little ribbon trim near the bottom edge of the skirt too, which really finished it off. I love how adaptable the instructions are. It’s a really good template for developing in future. I really wanted to say thank you for giving me the confidence to try something more difficult next time, and tell you that I’ve passed this link onto a couple of my new-to-sewing friends so they can try it out too. Thank you!
Aubrey
May 13, 2013 at 6:09 pmI sell some skirts on etsy very similar to this. In case you don’t have the supplies but still want a cute skirt!
http://www.etsy.com/shop/skirtsformacy
Ashley B
June 4, 2013 at 11:14 pmThank you for a easy-to-follow tutorial. As a beginner, I’m grateful for clear instructions that don’t make me feel like I’m being patronized. I appreciate the generosity of your knowledge.
Ann
October 6, 2013 at 3:48 pmThank you for the easy to follow directions. I sewed for years but somehow in the last 20 years I’ve just do hems and mending. Alas, granddaughters changed all of that and I loved the simple pattern – and it took 2!0 minutes!
Adrianne B
October 22, 2013 at 8:13 pmLOVE the fabric!!
Donna B
November 30, 2013 at 2:20 pmthanks for the great tutorial! I just whipped up 2 for my niece for Christmas who loves wearing skirts!
Deborah
November 30, 2013 at 7:49 pmI’m so glad I could help with your Christmas sewing–hope the girls love them! 🙂
I’m Sew in Love! | The Fruitful Home
January 23, 2014 at 2:36 pm[…] found a fantastic “20-minute skirt” tutorial to make a little girl’s skirt. Sounded easy enough. So that’s what I did (and yes, it […]
Liz Hansen
March 19, 2014 at 2:48 pmWow! So simple and sweet! Thank you…going to make one for my little granddaughter! She’s gonna love it! I love it when little girls wear skirts and learn to sit nicely in them too! hugs!
Deborah
March 20, 2014 at 4:36 pmI’m so glad you like it!! I’ve made a zillion of these–and now that it’s officially spring, am getting ready to make a half dozen more for our two girls! 🙂
LynneP
April 9, 2014 at 2:05 pmThanks for this great tutorial with pictures! Next week, my birthday present to my friend’s daughter is helping her sew her first skirt. Breanna is turning 11 and will come fabric shopping in my stash. This will be a great first skirt for her.
Margaret Trousdale / The Yarn Marm
June 18, 2014 at 11:36 amThank you. Great refresher. Got to make for my grand niece! Appreciate your enthusiasm, confidence, and expertise.
Deborah
June 18, 2014 at 3:21 pmI hope you’ll share photos of your finished skirt(s)! It’s such a quick project–so easy to make more than one. 🙂
Lynnette
July 7, 2014 at 1:07 pmthank you so much, my 3 yr old grandaughter wants a ‘long’ skirt and I did not want it to have too much material for her to get her feet caught in it. this is a brilliant pattern, thank you