
Welcome! For the introduction to this Sew-Along, see the initial post here. I’m blogging my Village Path Advent Calendar this Advent season one house at a time–newest at the top. Scroll down as December rolls along to see all the houses and my progress, and thanks for being here!
FINISHED!

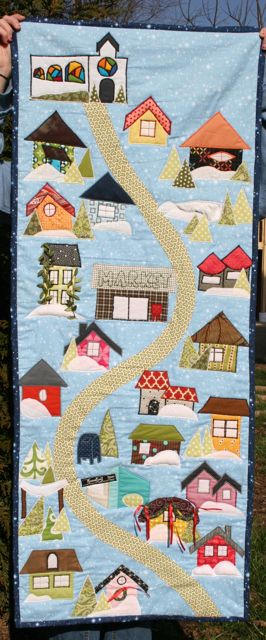
At last! Finally bound the final product and have it all ready to hang. I used another colorway of the same Space fabric that is the light blue background, and bound the edges like a quilt (good tutorial here if you’re looking). I also added triangles at the upper corners, like Elizabeth suggests in her book. I’ll have a dowel cut to hang this from next year, but for now: oldest child gets the privilege.
Hooray!! This was a challenging, long project, but I had SUCH a good time, and I’m thrilled to see it completed. I’m off to scout some of the post-holiday sales–I think the roof of the market needs a Santa-and-sleigh display, and I feel certain there must be an ornament of just the right size on the wall at Target or something… Most of the little decorations will wait until next year, but that will just give me a chance to snap them up at 75% off and add them by hand when this gets unpacked.
Thanks so much for sewing along with me, and for all the encouragement along the way! Without the accountability of having folks watching, I might’ve bailed on this, and I know that I’ll love it forever, which makes me super glad I didn’t. Woot!


December 24, 2010

I know most Advent calendars have you stopping on Christmas Day, but my mother’s had us arriving at the chapel on Christmas Eve, the last stop of the calendar, a quiet place to contemplate the joy that Christmas brings. I was super, super intimidated as I worked my way along and knew this building was getting closer, but I really shouldn’t have been–it was much simpler than I thought. Just a big rectangle with a steeple, and some stitches down the center to indicate the side of the building. The stained glass was way easier than I expected, too: I free-hand cut the basic shape, then cut the same shape from all the colors I wanted to use, all full scale. Then I cut out segments of each and layered them on top of one another, and stitched over every raw edge with a satin stitch:

I really love the finished result, and the fact that of all the colors and textures on the calendar, these draw your focus right away:


December 23, 2010

Somehow, this sweet, simple little house is just about perfect, with nothing to adorn it. Maybe this is where the vicar lives? I love how the texture of the yellow fades at a distance but is just the right stucco-like touch here. House is the same as #1, below.
December 22, 2010

After the sad disappointment that was the last house, this was is an unexpected success! The black seemed, at first, an unwise choice, but in the end, it really pops against the background and brings some weight to the entire composition. And I’m really digging on the little funky window. Hooray, little house, for getting my spirits back up!

Very nearly the end now! I’m working on the template for the mailbox that some of you have requested. The other houses are all based on the same templates below, and the lake was freehanded. All trees are simple triangles cut willy-nilly from the fabric. Same for snow and snowbanks!
December 21, 2010

Alright, I’m 21 days in on this thing, and I’ll behonest: this is my least favorite house by far. I had this idea that I’d give it a little front porch, so I cut a trapezoid as the shed roof over it, and somehow it just hasn’t gelled the way I’d hoped. No room for a window, the door kinda seems like an afterthought–I’m just not in love with this one. Not sure he’s going to make the cut and stick around, so I haven’t bothered to add snow or a tree outside.

The whole thing has gotten so big that I can’t even shoot images of it all at once! I’ll keep adding update shots as I go, but will save a Grand Reveal for Christmas Day when it’s hanging in the house with all our presents unwrapped beneath it.
December 20, 2010

Whoops! I forgot to photograph this one as I was working, and skipped right over him. Poor little guy.
December 19, 2010
 A little orange, candy-colored confection of a house. I like the lopsided roof on this one, and the little crooked trees. Like a Charlie Brown house. Which reminds me: just about time to watch Charlie Brown Christmas this year!

I can hardly believe how well this has come along so far! It’s time to change my needle for sure–I notice that with machine applique especially, I get MUCH better results with a fresh needle.
December 18, 2010

Why even have a quaint, snow-filled village if there’s no pond on which to go ice skating? Voila! An ice-skating pond! Little hillocks of snow for making snow angels in, and trees to hang your skates on when you’re done. This shiny fabric is leftover from my oldest child’s halloween costume this year, and the shapes are all totally free-form, just sliced out of fabric willy-nilly. I am totally in the mood for cocoa now.

December 17, 2010

Seems like every town has that one funky house, the one that doesn’t seem to make sense. My uncle lives in a small town, in a house shaped like a castle, but made of red brick. It was built in the 40s and his room is in the turret. I’m pretty sure everyone else in the family makes fun of him, but he loves his crazy house. This is my village’s crazy house: funny round roofs like stovepipes, weird elongated windows (they probably slide to open, don’t you think?). Sad little tree at the side. I love this funky house.

December 16, 2010

Perhaps not my favorite house so far, but I really love the new tree fabric I dug out of some old precuts I had floating around. About time we got some holly berries up in here. I will say: I’ve gotten to where I really like the wonky houses best, the ones where the windows aren’t quite straight or the roofline is just a teeny bit off. They’re pretty charming, I have to admit.

December 15, 2010

Is it silly that I’m, like, REALLY excited about the Market? Once I did the mailbox and the tree stand, it occurred to me that I’d be happier with the village if it was really a VILLAGE. So: Market. The letters are outlined in backstitch, full six strands of floss, and will be satin stitched when the kids are in bed. The red pot? For the Salvation Army, of course! I like how this brown plaid mimics bricks, and the roof is subtly textured. I don’t even think the French schoolgirls mind living behind the grocery–there are no dumpsters or stinky odors in this village. You know, like in Pleasantville.

December 14, 2010

This one reminds me of Madeline’s little house in Paris. So naturally, it had to be all covered with vines. The leaves are a ribbon trim I had leftover from a mermaid costume a couple years ago. Perfect for accenting this French facade!


December 13, 2010

If Anna Maria designed a teensy chalet…

December 12, 2010

Cute little Spanish-style house with two stories. I love the Joel Dewberry tiles for the rooftop. This is the roof from house #2, and the body of the house is cut in a square with a line of satin stitch down the center to define the two wings of the house. I love how adding another roof makes this house look completely different from the other houses with the same shape!

Just about halfway there–and really coming along!
December 11, 2010

I decided to run with my idea of filling in the skinny space on the left with a Christmas tree stand–and I’ll be honest, I kinda love it a lot. Still planning out the embroidery on the sign. Maybe crimson letters in a satin stitch? Black letters with tiny wreaths on either side? Needs more mulling. But for now, I think it brings some great balance to the overall design:

December 10, 2010

This house–which is another of house #2, with a taller profile–is reminding me that we need more snow in this here village. So I’m going back and putting in some more trees as I go along. You can see the two trees pinned in here, filling in the open space between these two houses.

December 9, 2010

Another very simple house, which turned out so sweet and which I really like. This is the house #1 template with the same roof, but filled in to make a whole triangle. As I work back through the village and add decorations, I wanted a more solid roofline to support some of the wreaths and things. Maybe this guy gets a super-tacky Santa on the roof? Awesome.

December 8, 2010

Along the same lines as the Christmas tree stand (which is still fermenting in my brain), this mailbox worked out to be a great addition that takes up less space than a whole house but gives a lot of variety to the overall calendar. A dear friend dropped by the other day (I love the surprise drop-in visit, don’t you? Makes me feel special!) and suggested this–I love it, even if I do think it needs a little more. Maybe an eagle on the side, or a white label on the drawer? I didn’t make a template for this one yet, but if you like it enough, I can scan in the sketch I used to create a pattern.

Really filling up now! Pretty soon I won’t be able to shoot a photo of the whole thing here on my cutting table…
December 7, 2010

Simple house with a not-so-simple paint job. This is house #2, with a different window and puffier snow. I like that the print is whimsical without being over-the-top–most of the other houses are micro-prints, so this seemed a little like a risk, but I’m pleased with how the colors and shapes play out!

December 6, 2010

Simple little house with double roof. This is the house #1 template and roof, and the smaller roof has the ends of the eaves shortened. I set it a little further away from the neighbors, what with their bunting getting in the way, but I’m thinking of going back and adding some snow to cover up my flub. I would totally live in this little house, BTW.

Off to the left there you can see where I’m playing with the idea of a Christmas tree stand as one of the stops. Still mapping out how much room there will be–I don’t want to have a bunch of empty street up ahead, but this spot is a little too narrow to add another house here later if I need the space. I’m thinking a tree stand might be perfect!
December 5, 2010

Time for a little mid-century mod in our village! The neighbors are a little irritated by this particular house, but since there’s no HOA, all bets are off. I LOVE the way this one turned out, and think it really adds some spunk to the street. Might even be rethinking some of the future houses based on this one.


I especially love how the texture of the linen I used for the side mimics the color and texture of concrete. Very cool. I cut all these pieces freehand, but can whip up a template to download while I make the next one. Woot!
December 4, 2010

House #4 is a charming ski chalet with a rounded roofline. I’m a little concerned that the brown I chose makes it look like a moustache house, but you and I might be the only ones who ever notice that.


I planned and expected to do a rounded window here, given that it’s a Swiss-inspired little house, but somehow the assymetrical one spoke to me more.

The little machine-appliqued tree at the side was cut at an angle to tuck it behind the red house, and keep the whole composition looking planned (even though it really isn’t). Template for this style, House #3, is here.
December 3, 2010

House #3: The John Cougar Mellancamp house. I love the way the little trees turned out, and the snow drift that’s creeping up the side. The roof is the same as house #1, minus the chimney. The house body is a longer, skinnier rectangle than house #1, though, making for a taller profile.


I played around with the wreath some more–I think it was the color of the green in the first one that I didn’t love. I used a different fabric for this new one , and folded long, thin strips in half wrong sides together before braiding them, so I wouldn’t see any of the unprinted wrong side in the finished wreath. I stitched through the ends and then hid the stitching under the ribbon. I like this one MUCH better, and funnily enough, it likes this house better. House #2 is begging for a string of giant retro bulbs.
 I think for house #4 I’ll continue adding trees between the houses to tie the village together. I want to avoid having it look too disconnected, and am wondering if I’ll even have some trees–or houses–spilling over the edges of the background, partially covered by the binding when it goes on. We’ll see, I guess!
December 2. 2010

House #2! I’m working on the theory that keeping the sheer number of different house shapes to four or so will keep the village from looking too busy. This one, inspired by Melissa of Checkout Girl, has a different roofline and a sweet rounded window.

I’m playing with the idea of the wreath. I know I want the village to host some kind of Christmas light competition, but the mayor is giving me the runaround. Something about ordinances.

To use this template, download House #2!
December 1, 2010

The background for my Advent calendar is 1.5 yds of quilt-weight cotton, cut to measure 24″ wide. I’m pretty sure you could make the same design with a half yard of fabric cut crosswise (so it measures 18″ x 45″), but I wanted more length, and opted to use more fabric. I admit there’s quite a bit of waste with my method, though, so you won’t hurt my feelings if you’d rather use a half yard. The village path is made of a 3″ strip of continuous bias tape, edges pressed under. One of the many, many things I love about bias tape is that you can use steam to stretch one edge and create a permanent curve–I did that with this to make an S-shaped path leading through the village-to-be and ending at the door to the chapel. For a better idea of the overall picture, check out the original inspiration here.
I’ve batted and backed the piece already, and am appliqueing each house on through all the layers, effectively quilting it as I go. I’m thinking when I get done with all 23 houses and the chapel, I’ll quilt the whole thing before binding it.

I had originally planned to make the background white, but we were out of white Kona at the shop, so I had to think outside the box. I’m actually delighted, too, because I love the way this Space: The New Frontier fabric mimics the look of snow on a clear blue background.

It was the “snow” that made me wonder if I could pull off little hillocks and snowdrifts across the village. I might’ve overdone it here–will have to sleep on these and see how I feel in the morning!
If you’d like to sew along on this pattern with me, download the template for House #1 and get going!
4 Comments
Tweets that mention Advent Calendar Sewalong — Whipstitch -- Topsy.com
December 1, 2010 at 4:22 pm[…] This post was mentioned on Twitter by Deborah Moebes, Deanna Pavay. Deanna Pavay said: RT @whipstitch: House #1 in the Advent Calendar Sew-Along is up! Follow along here: http://tinyurl.com/3xemuxe […]
Organizing My Fat Quarter Stash — Whipstitch
December 2, 2010 at 3:18 pm[…] today’s house and to see the village’s progress, check out the Advent Calendar Sew-Along […]
Advent Calendar: Nearly There! | Whipstitch
December 21, 2010 at 4:16 pm[…] I don’t think it’s too late for you to make yours, too! Check out the progress on the Advent Calendar Sewalong and share your photos of your Advent calendars in the Flickr […]
Advent Calendar Sew-A-Long | Whipstitch
December 3, 2015 at 10:13 am[…] the step-by-step instructions and templates on the Advent Calendar Sew-A-Long page–scroll down for Day 1 and work your way up to the stained glass on the chapel window for […]