This project has evolved gradually, over time, with bits and pieces added as we’ve gone along. I’d like to acknowledge the brainstorming and input of my sweet husband, who reminisced about his own favorite toys as I told him of my plans, and reminded me once again that I am not a boy–which is (one reason) why it’s so nice to have him around.
I’m really excited to be part of the Celebrate the Boy festivities again this year–thanks to Rae of Made by Rae for inviting me! Initially, I’d planned a (very cool, in my mind) bow-and-arrow set for our boy. The construction of the arrows and quiver was quick and super cute, but the bow kept letting me down. And by letting me down I mean: it totally tanked. Nothing I could come up with was an adequate boy-sized bow that would shoot an arrow without putting out an eye. I tried paint stirrers, giant rubber bands, you name it, and nothing was quite right.
So my husband and I are talking and I mention this project, and I say I’m about ready to scrap it all. Problem is, I can’t let Rae down, and I don’t want to phone in some lame craft. So I started thinking about what our boy, Captain Destructor, might actually need. Which immediately led to me thinking about food–because that child can EAT, let me tell you. So, what he really needs is some kind of snack delivery system, some way to tote his snacks at the tips of his fingers. A snack bandolier.
If you’re anywhere close to my age, when you hear the word “bandolier,” you think of one thing: Chewbacca. Which is what my husband thought of. He told me when he was little, one Christmas he got a Chewbacca bandolier that was designed for him to carry his Star Wars action figures across his chest. He had the exact same sound in his voice he gets when he talks about the new Audi R8 or 6000″ wide flat screen in-home theater system. I was at my sewing machine quicker than he could wipe the nostalgic tears from his eyes. I think I left him wistfully dreaming of all the games he and our boy could play together (probably in their matching bandoliers).
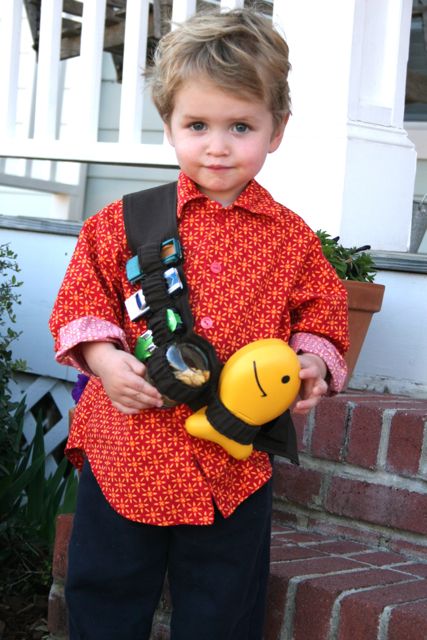
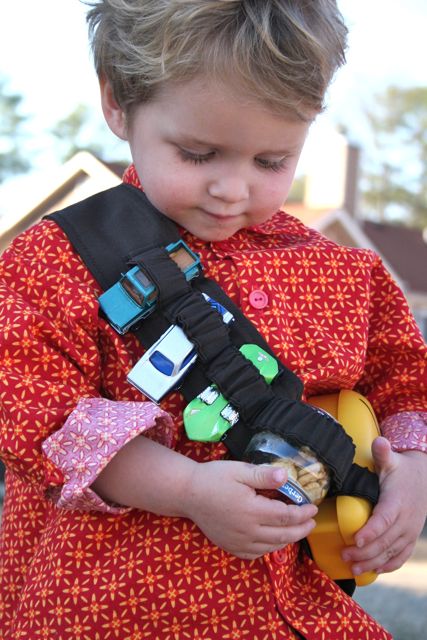
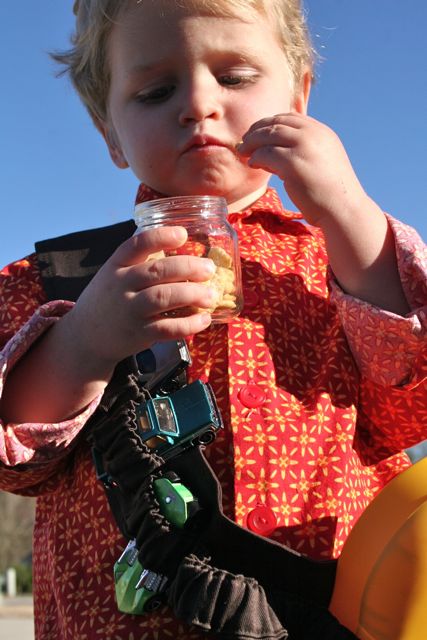
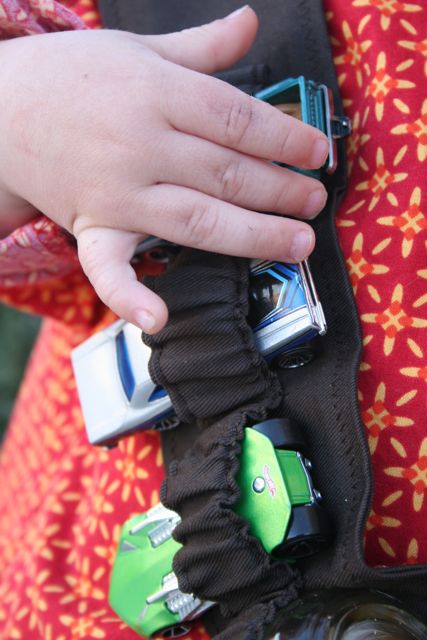
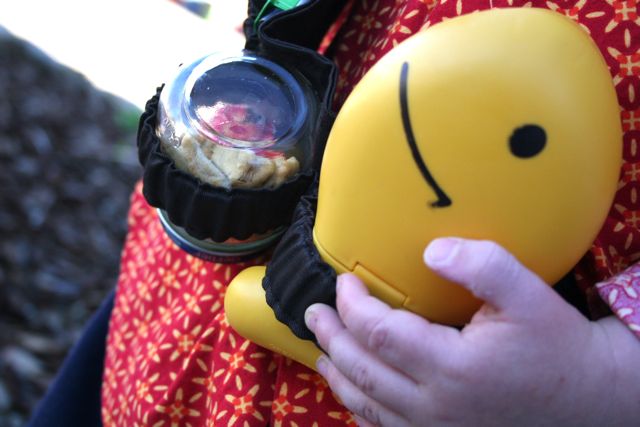
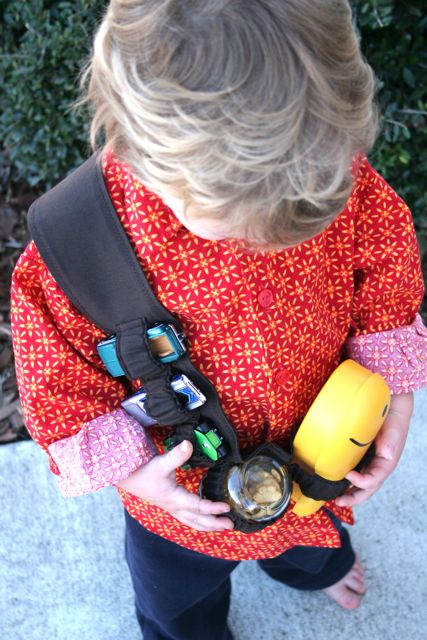
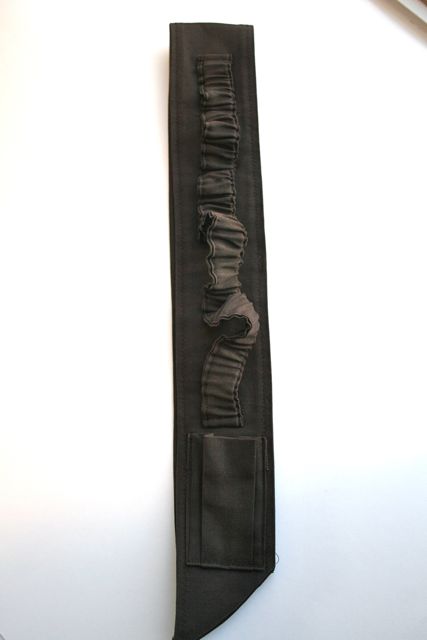
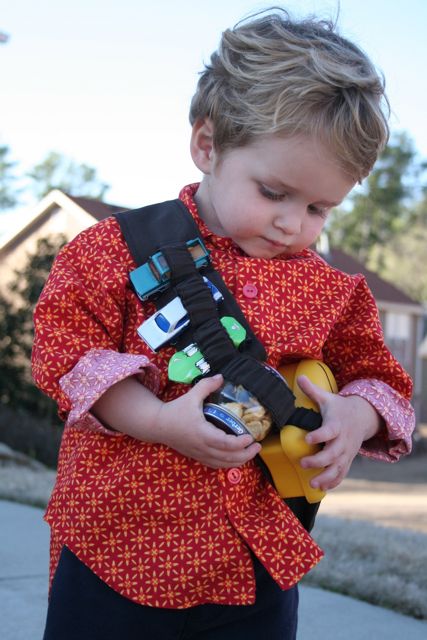
Our boy completely loves this thing. I made loops for his favorite cars and his favorite snacks, and a small gusseted pocket for the itty bitty things that seem to always find their way into boys’ pockets. I could easily have put more loops on the back, but was so excited to see him wear it that I didn’t take the time–an older boy, I expect, would benefit from more loops. He can carry granola bars, fruit snacks, cheese sticks, bags of snacks or his very own personal Goldfish container everywhere he goes–a dream come true.
Snack Bandolier Tutorial
This is a quick project with straight seams and basic supplies. Figure it will take you around an hour of sewing, not counting cutting time.
Supplies:
- 1/2 yd cotton fabric (I used a mid-weight twill for strength)
- 1/2 yd fusible interfacing
- 1 yd elastic, 1″ wide
- matching thread
- snaps or buttons (optional)
Steps:
Cut 2 strips of fabric for the body of the bandolier measuring 3″ x 30″. *I based these measurements on our 2-year-old–you might need more length depending on your child’s age.
Cut 1 strip of fabric for the loops measuring 2.5″ x 24″.
Cut a square of fabric for the gusseted pocket measuring 4″ x 3″.
Make the Body of the Bandolier:
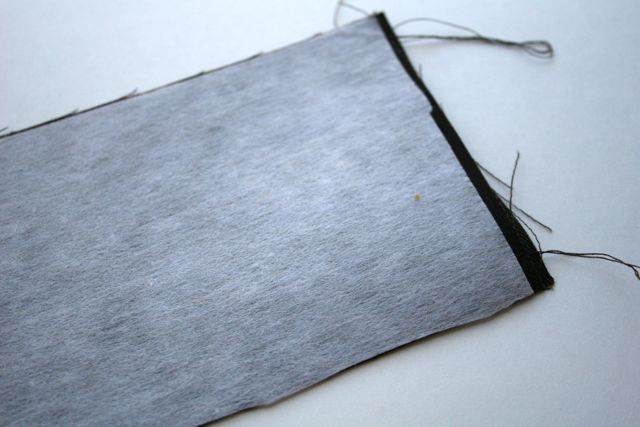
Apply fusible interfacing to the wrong side of one of the 3″ x 30″ cuts. Trim edges.
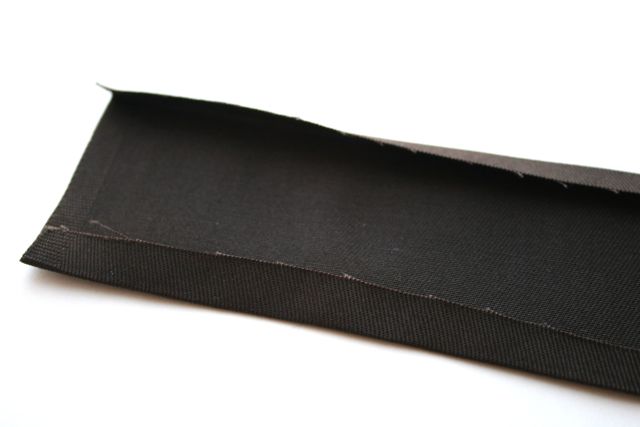
Stitch the two body pieces right sides together along the two long edges, leaving the short edges unstitched.
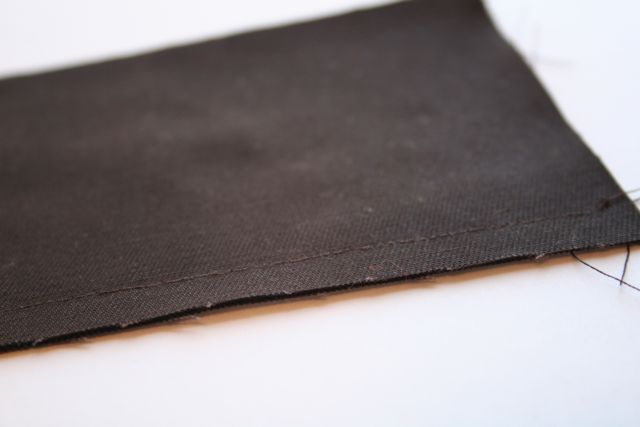
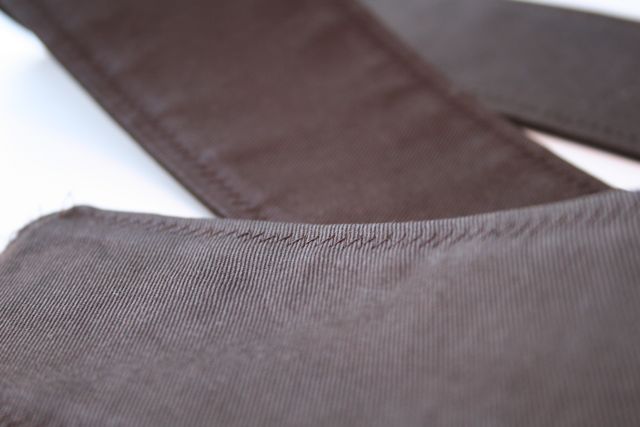
Turn right side out and press. Topstitch close to each of the two long edges using a zigzag stitch.
Make the Loops:
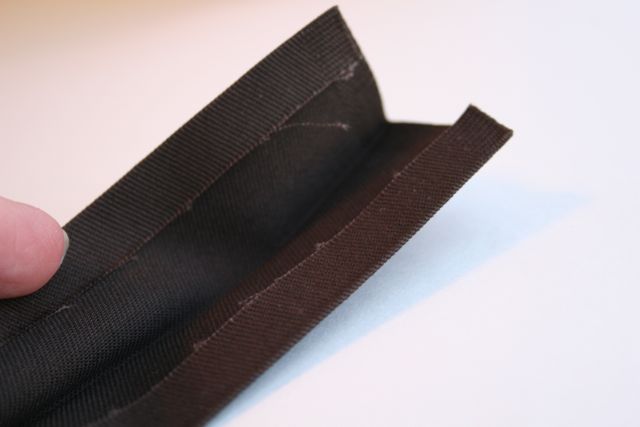
Press in each long edge of the 2.5″ x 24″ cut approximately 1/4″ using a hot iron.
Fold in half lengthwise (like a hot dog, not a hamburger) and press again, keeping folded edges even.
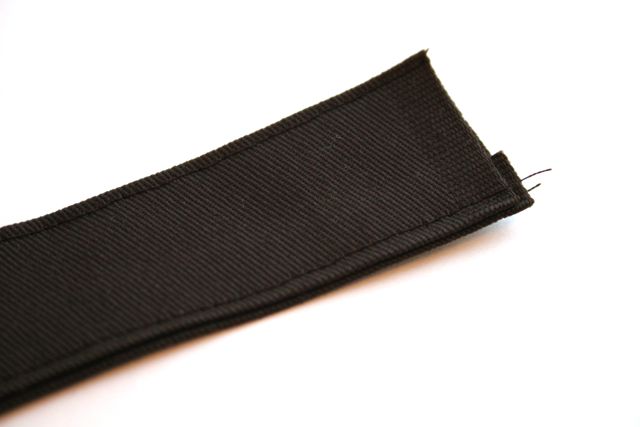
Topstitch along both long edges, close to the fold, using a straight stitch.
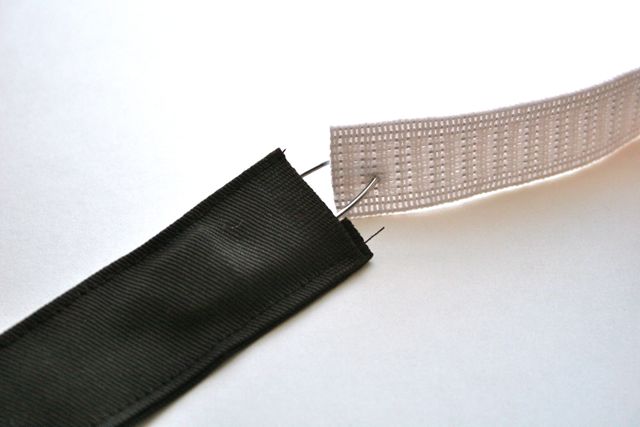
Insert elastic into the opening at one end using a safety or diaper pin to guide the elastic into the channel.
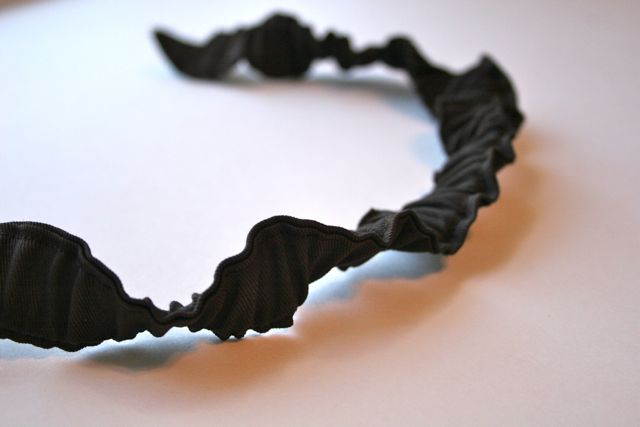
Continue guiding the elastic into the fabric tube by scooching the pin forward, holding it tightly, then pulling the fabric back to allow the elastic to move along the channel. Keep going until the pin comes out the other end. Trim the elastic to fit the casing. You will probably find that the casing has gotten kind of “snakey” and gathered up some.
Attaching the Loops to the Body of the Bandolier:
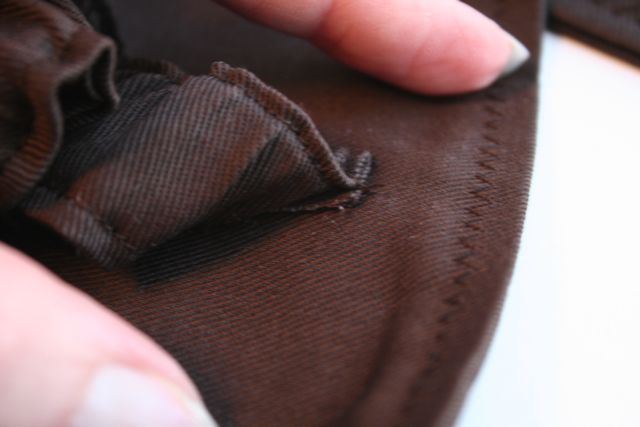
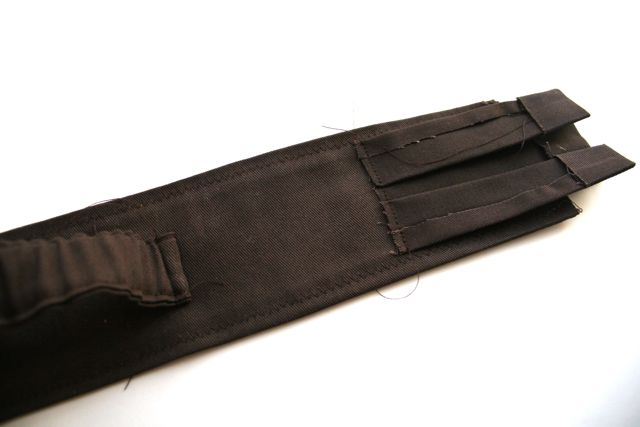
Determine the placement of the upper-most loop–this should be more or less at the center of the 30″ body strip we just completed; the raw ends will be stitched together and be the bottom of the bandolier when it’s finished. We’ll attach the loop strip by securing one end, then folding it back on itself to trap that first raw edge under the strip as a whole. It sounds odd and backwards, but it totally works and gives a nice, clean finish. Place the loop strip so that the raw edge is pointing toward the body of the bandolier and the length of the loop strip is heading AWAY from where you want the row of loops to go. Stitch across the loop strip close to the raw edge to secure it in place.
Now, fold the loop strip back in the direction we want it to go. You’ll use the body of the strip to cover up that first set of stitches and hide the raw edge underneath it. Fold the strip over the last set of stitches, then stitch again across the strip close to the folded edge.
For each item that you’ll add, make a loop of the elasticated strip that’s snug enough to hold the item in place. I laid my boy’s cars on the bandolier to test them, but you can throw down a granola bar or some fingers–whatever you like. Just be sure to make it snug and ensure that the elastic is getting some stretch. At the bottom of each loop, stitch across the loop strip from side to side (I like to backstitch a couple times and really get it secure). Move on to the next loop until you run out of strip.
At the far end, you’ll make another clean edge like the first: stitch down the raw edge close to the end, then fold the strip back on itself and stitch over the fold.
Make the Gusseted Pocket:
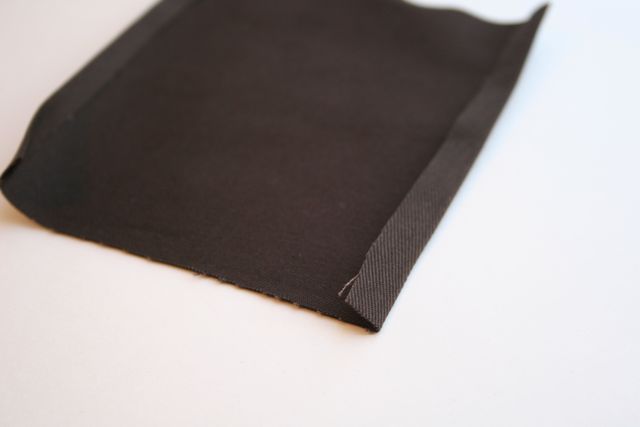
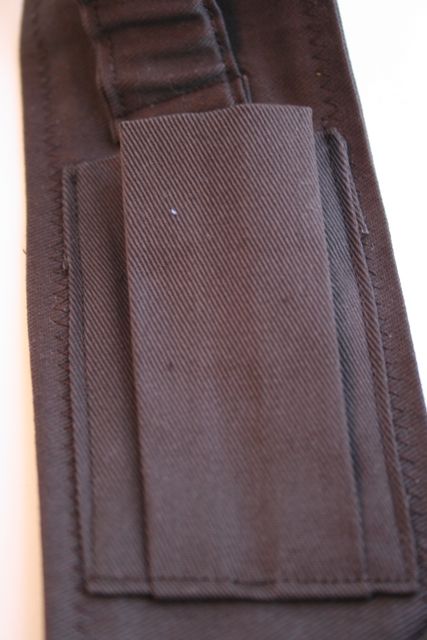
This technique works for a gusseted pocket any place: cargo shorts, apron fronts, anywhere you want a pocket that has some real storage capacity. Begin with the square of fabric. With the 4″ dimension going east-west, press in the two sides by about 1/4″.
Open those folds out and fold the upper edge over, right sides together, about 3/4″. Stitch this edge in place NOT from side to side, but from top to bottom, on both left and right. Use the press lines as a guide.
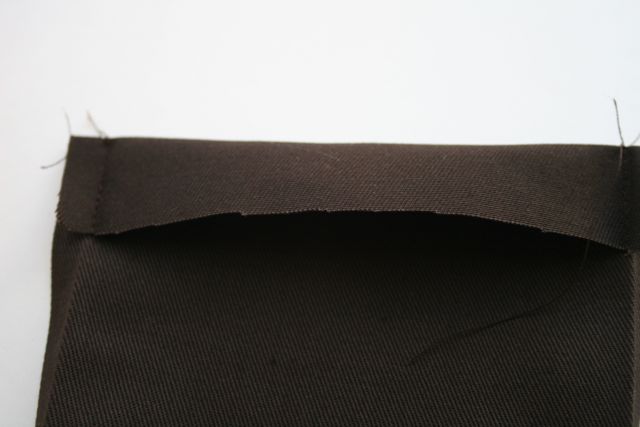 Trim the corners off at an angle, then flip the folded upper edge back to the rear. You’ll see that it makes a nice, clean upper edge to your pocket, and also that it forces those sides to pop back into place along the lines that you pressed in.
Make two pleats, one on each side (left and right) of the pocket, including the folded upper edge in each pleat. These are the folds that will make the volume in the pocket. Press vigorously with the iron.
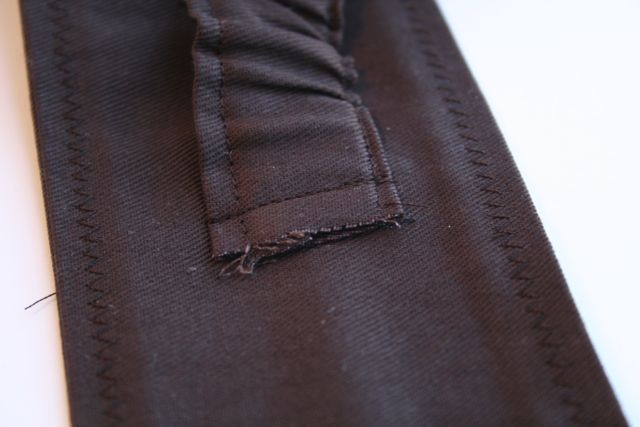
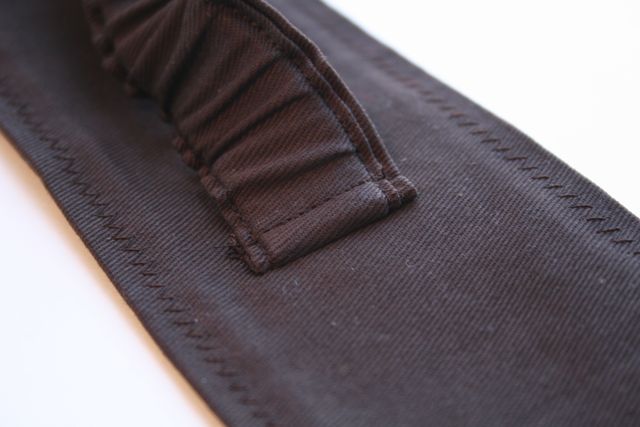
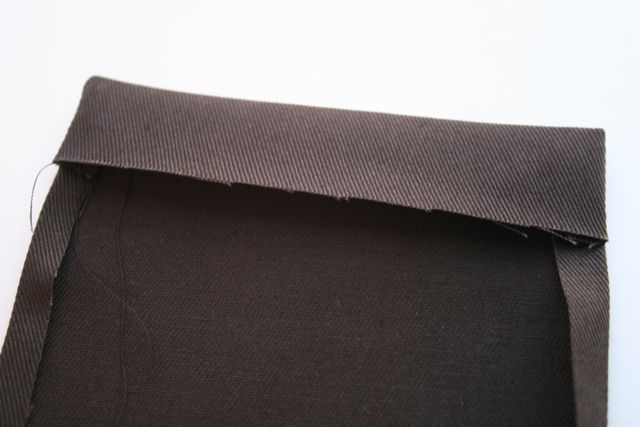
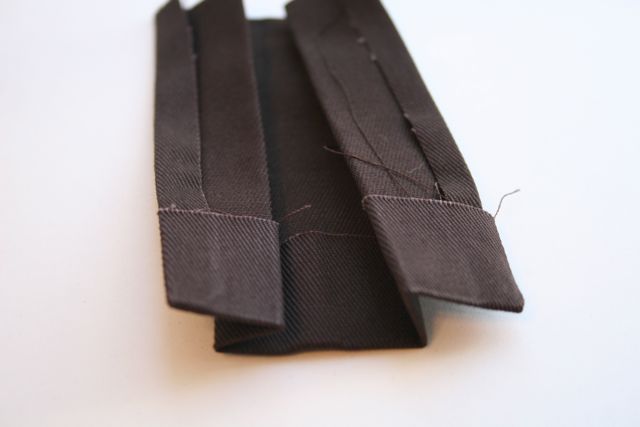 Now attach the pocket to the body of the bandolier using the same method we did for the loop strip: place the pocket right sides together and upside down on the bandolier body, making sure you’ve left enough space for it to fold up later. Stitch very close to the upside-down lower raw edge of the pocket to secure it in place.
Now, fold the pocket back up so it’s pointing up toward the shoulder of the bandolier (which is to say, toward the center of the body of the bandolier) and press the lower edge over the initial stitches. Stitch all the way around the three sides, securing sides and bottom to the bandolier body, leaving the upper edge open.
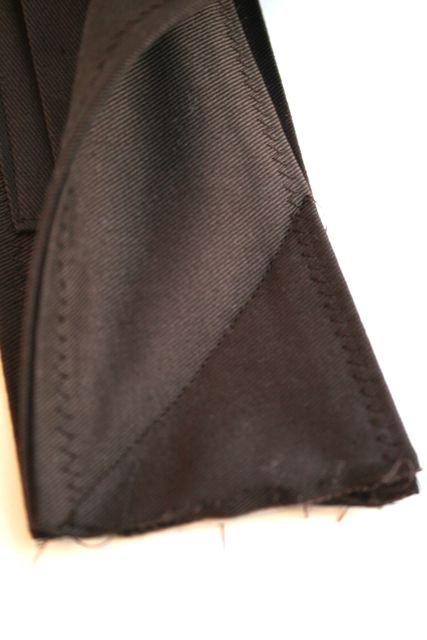
Finally, stitch the two raw ends of the body together, right sides facing, using an angled seam–this will make the bandolier hang better on his little body when you’re done. Trim off any excess close to the seam line.
Amazing!
Happy man, with his snacks and his cars, able to eat and play as soon as the need arises!


Molly
March 3, 2011 at 1:31 pmOh. My. Goodness! This is awesome!! Oliver is so going to rock this this summer in all his clothesless glory as once the weather gets warm he is pretty much naked all day!
Cherlyn
March 3, 2011 at 4:17 pmHahahaha! That is awesome!!! I will have to make one for each of my boys (including my Star Wars lovin’ husband 😉 ) Thanks so much for this!
Jackie
March 3, 2011 at 6:09 pmI LOVE this! I can see myself making a couple for a combined ‘hotwheels’ themed birthday coming up and then being conscripted to make more for my own boys.
Courtney
March 3, 2011 at 7:44 pmJust telling my husband about this and as soon as the picture came up he goes “Just like Chewbacca had!” Then I read him your paragraph about your husband and he goes “yes, yes, they made one but I never had it because it was just before my time. Oh that’s so cool, I would have loved that as a kid. That’s so cool.”
Now he’s wiping the nostalgic tears from his eyes and I’m contemplating trying to make the adult version.
This is fabulous, thanks for sharing!
Deborah
March 3, 2011 at 7:56 pmCourtney–
That’s hysterical! I laughed so hard that I went and did some Googling. Found this: http://theswca.com/index.php?action=disp_item&item_id=39703
My husband will flip when he sees it. And cry. Whatever.
🙂
Jenny Yarbrough
March 3, 2011 at 9:51 pmI love this Deborah! Great idea and instructions… gotta add it to my list. I need to stop by when I’m in Atlanta again!! Whenever that may be. Hope you’re doing well!
lisarenata
March 3, 2011 at 10:12 pmThis is just so awesome!!! I know my son would totally love love LOVE it! Thanks for the tutorial- I think I know what I’ll be making him for his B-day in a couple of weeks. Yey!
Peiling
March 4, 2011 at 12:38 pmIt’s 1am in Singapore but your cute tutorial post is keeping me awake (and smiling!).
My 4-year-old is still too young to know who’s Chewbacca but he will certainly find this the coolest thing to have! He loves cars and such, and always carry around a handful of (at least) 4 toy cars (and a dinosaur play-card!) – you can imagine what a huge and clumsy handful that is (and he keeps dropping them on the floor at the mall!)
… This bandolier will save the day! yay.
liveacolorfullife
March 4, 2011 at 5:45 pmOkay, first I couldn’t take my eyes off the darling little blond boy. Second, this is PERFECT for my grandson. Thank you SOO much!
Guest Tutorial: Snack Bandolier : Pink Mela | Beauty | Style | Fashion | Craft
March 5, 2011 at 4:30 pm[…] The ever-hilarious Deborah of Whipstitch is here today with a tutorial for a handy and clever snack bandolier, inspired by a Chewbacca bandolier owned by her husband when he was young (hee!) Her adorable son models it for us here: As you can see, the snack bandolier is not only handy for snacks, it can carry toys and and many other fun things. Sky’s the limit here, whatever your child can stuff in one of those holsters becomes fair game (playdough cannisters! raisin boxes! thomas the train!) Click here to go to Deborah’s tutorial for the Snack Bandolier […]
Ginger Garff
March 5, 2011 at 4:48 pmI love this! I’m in the middle of making it right now for a two year old’s birthday party next week. One question – is the elastic piece really only 2″ wide? Because I’m having a hard time getting even 3/4″ elastic into it, after folding in 1/4″ and then topstitching….
🙂
Deborah
March 7, 2011 at 12:37 pmGinger–
Good catch! You’re right, it should be 2.5″ instead of 2″. I’ve updated the instructions to reflect the change–thanks for noticing that!
BerryK
March 6, 2011 at 12:19 pmWhat a cool project! I can’t wait to make this for my six year old.
Also, can I babysit that precious toddler of yours? I stared at the photo of his chubby fingers for two whole minutes! Missing those days!
Erin
March 7, 2011 at 9:57 amI love this idea! Today is my nephew’s 2nd birthday and I made him one of these using your tutorial. The tutorial was great, thank you! I clearly remember my own boys at two and how their hands were always full of their “treasures” so this is the perfect solution Here it is on my blog: http://erine.typepad.com/eckenrode_family/2011/03/here-lately.html
MaLora
March 7, 2011 at 8:26 pmI can’t wait to make one! I love it!!!
Elisabeth
March 11, 2011 at 2:02 amThank you so much for the terrific tutorial. I finally got one finished for my nephew and my son will be next! So simple and quick! Thanks again!
Curses! And hooray! But also: curses! | Whipstitch
March 11, 2011 at 4:11 pm[…] giant thanks for all the Snack Bandolier love! I’m hard at work on an awesomely pink Barbie version–just have to get […]
BerryK
March 12, 2011 at 3:34 pmI just finished making this for my six year old. It turned out so cute! He was entranced by your son’s Goldfish container and luckily, my husband found one at the grocery store. Thanks for a fun boy project!
mØmmacat's blog » Blog Archive » Sew what!
April 7, 2011 at 1:52 pm[…] Ya know ‘cuz the girls always get the fun princess and fairy dress up stuff. I found a cool bandolier that a mom had made for her son. She made it for matchbox cars and snacks. I thought about our new Nerf love (both little boy and […]
Rhea
April 7, 2011 at 1:54 pmThanks for the great tutorial! I just finished my version. I used wide elastic instead of a casing.
http://www.m0mmacat.com/2011/04/07/sew-what/
Sarah Martina
June 12, 2011 at 11:39 amThank you so much for remembering the Captain Destructos…. I mean little boys…. in our world! 🙂 I love this and can’t wait to give it a go! 🙂
Stacy Sews - Diary of a Fabric Junkie » Blog Archive » Linky Thursday
June 16, 2011 at 8:56 am[…] author of this tutorial calls her design, The Snack Bandolier. I prefer, The Hotwheels Gunbelt – brilliant creation (although I’m 99% sure that […]
Kim Hays
June 29, 2011 at 11:04 amHi, I’m an editor at Parenting magazine and this is a supercool product. Can you email me at kim.hays@bonniercorp. com. I’d love to talk to you about it more.
Kim
Homemade Snack (Or Car) Bandolier - Toddler Activities
August 5, 2011 at 5:37 am[…] on over to Whipstitch for more details about the Snack Bandolier and a detailed how-to tutorial. If you enjoyed this […]
ally
August 10, 2011 at 7:20 amI love this
I could never make it
But my son would die and go to heaven if I did 🙂
shantel
September 3, 2011 at 9:09 amI featured this on my blog today!
seemesew.blogspot.com
PCTuesday
September 12, 2011 at 5:58 pmSaw this on Pinterest today! So glad to find this! I am making it for my nephews TOMORROW!
A Toy Gun Bandolier « so resourceful
January 29, 2012 at 7:52 am[…] I thought it would be a great idea. I searched online for a tutorial and all I found was this Snack Bandolier by WhipStitch, but it was easily adapted to turn it into a toy gun bandolier! I used denim from an old pair of […]
Boy’s Bandolier to Hold Toy Cars « Sabia Lane
February 13, 2012 at 11:24 pm[…] I followed the tutorial for a Snack Bandolier from the Whipstitch Fabrics […]
pat eads
February 25, 2012 at 10:59 amThank you sooooo much! I can find lots to make for my granddaughters, but very few things for my grandson. I am getting started today. I am so excited about putting this in his Easter basket. He is Cars crazy. and I am sure he will love it.
Car Bandolier « Go Dansker
March 25, 2012 at 10:22 pm[…] with his cars. When he comes to visit us he brings them with him, to share and show. So using this tutorial here (with some modifications: I added 3 inches in length since this was for a bigger kid) I made him a […]
Kate
March 26, 2012 at 2:43 pmHey, I just remembered today that I saw this tutorial on made-by-rae.com once… I started right away and it went out sooo great. I intended to give it to my little boy (20 months) and he at once got the idea of it. Thank you so much! Even my husband saw the Chewbacca-reference at once…
Turns out that my daughter (nearly 6 years) wants her own (in pink) because her little horses fit in there very well, too.
I made a few changes to your original and will write about that in my blog (hopefully today)… and of course I will link this for a reference. If you would like to have a look you’re very welcome.
Thanks for the amazing idea and the great tutorial!
Sara
July 8, 2012 at 3:19 pmThank you so much for this tutorial!! My 18 month old son is beyond obsessed with cars, trucks…pretty much anything with four wheels, but his hot wheels always seem to disappear. This is going to make the perfect xmas present and hopefully the solution to our little problem =) Many thanks, again!
Charlotte Walker
July 10, 2012 at 10:18 pmLove, love this! I have an active boy who is going to enjoy having his very own bandolier! Boy crafts are not nearly as easy to find as girl things. Thanks for posting this.
Stitchgirl78
July 23, 2012 at 11:21 amI love the bandolier! However, I’d suggest a small plastic container instead of a glass baby food jar. Plastic is much safer : )
Morgan
July 23, 2012 at 11:47 amLove this! I’m going to try making one in the future when our little girl is a tad older. But I’ll figure out a way to make it more girly. *I’d probably make note that it’s not a great idea to give a glass jar to a little kid to run around with.* 😉
Robyn
August 26, 2012 at 7:21 pmOh, that’s too cute!!
Kimber Weller
August 28, 2012 at 2:36 pmIs there any way that I would be able to purchase one of these bandoliers from you? My soon to be 6 year would absolutely love this and I do not know how to sew. Please let me know.
Thank you!!!!
Deborah
August 30, 2012 at 2:24 pmKim– I don’t sell these, but am working on licensing the pattern to various artists who want to make them for craft fairs. Stay tuned for info! 🙂
Laura Grisham
November 17, 2012 at 12:23 pmKimber:
I would be tickled to death to make as many of these as you need. I haven’t listed them in my shop just yet because I haven’t had the opportunity to take any photo’s. Jut click on my etsy shop and leave me a “convo” /conversation/note. I currently have tons of red, heavy duty fabric that sewed up beautifully. These “toy and snack straps” would be cute with decorative stitches or embroidered names on the back. I’ve even thought about sewing on reflective strips in case a little one is outside at dusk.
Just contact me!
Laura Grisham
October 30, 2012 at 1:18 amI would love to create these and offer them for sale in my etsy store. Of course, I would want your blessing as well as your permission to use your pattern; your name and copyright date would be stated in the listing. Minor changes may need to be made to accommodate for various size boys…like a buckle closure, etc. What do ‘ya think?
Emily
November 11, 2012 at 4:22 pmGenius. There’s nothing else to say!
Laura Grisham
November 15, 2012 at 2:52 amMade my first one this evening and it was a cinch! I used Velcro strips for the closure & applied two to allow for adjusting the size. Please send me an email because I would REALLY love to offer these in my Etsy shop!!
Thanks so much for your wonderful idea!
sarah
November 2, 2013 at 9:56 pmLaura – Do you make these?
can you send me a link if you do please
Denise
December 9, 2012 at 1:08 amI made a few of these this week. Fun and easy to tweak for different sized kiddos. I made a loop in the back at an angle to hold swords… awaiting testing by kids… 🙂 Also, to make the elastic feeding through part easier– I sewed in my measuring tape, making sure I didn’t catch it in any stitches, and made sure it was sticking out both ends. Then I safety pinned the elastic to the tape and slid it right through! Much faster. Thanks for the great idea.
Mama Monday: The Race to the Finish «
December 17, 2012 at 5:32 pm[…] via whipstitch […]
Joy Clement
February 6, 2013 at 9:04 amI would love to make these to sell in my etsy shop as well. I have plenty of girl things in it but I would love to add more boy things. How do I get permission to sell the items that I make from your tutorial?
Deborah
February 9, 2013 at 1:26 pmHi, Joy! I’m working on a licensing arrangement for the snack bandolier–I’m hoping to roll it out sometime in early March. Stay tuned to the blog for details!
Julia
February 24, 2013 at 2:47 pmAs an OT, I’m very excited about the way this can promote dressing skills! A way to practice manipulating things near to your body without it having to be as difficult as buttoning or snapping. I may be buying a sewing machine finally so my students can experience this fun activity! Oh how they love cars.
Maia
June 15, 2013 at 8:12 pmThis is an awesome tutorial! I’ve made one for my son and am rolling out a few more to give as gifts to the friends of my sons. Thank you.
Heather
June 27, 2013 at 1:36 pmAwesome! I think these should be standard issue for all little kids! Thanks for sharing!
Jana
September 24, 2013 at 6:13 pmI love this! Although when I said “Bandolier” to my hubby, he thought of Saving Private Ryan. History guy, not so much Star Wars, lol! When I mentioned Chewy, he asked what the heck Chewy carried in his bandolier since he shoots a lazer crossbow. Which itself doesn’t make sense, but since bandoliers are for ammo, what’s he carrying? Yeah, yeah, he’s nitpicky that way, lol! He likes historically accurate movies, apparently.
Deborah
October 1, 2013 at 10:46 amHaha!! This cracked me up–and then I shared it with my husband and it irritated him for the rest of the evening, because WHY does he need a bandolier? Am sure there’s a Star Wars junkie out there someplace who totally has a lucid explanation. Maybe then your husband will be on board?? 🙂
10 Cool DIY Christmas Gifts | Natural New Age Mum
November 14, 2013 at 9:43 pm[…] Toy and Snack Strap. For kids on the move – their own strap to hold toys and a little jar of snacks. Really fun and original! Find the tutorial at Whip Stitch. […]
Angela Dean
November 28, 2013 at 12:02 pmI am wondering if you might be interested in making one of these for me? I love the idea for a Christmas present and just don’t have time to accomplish this before Christmas. Love to hear.
Deborah
November 30, 2013 at 7:48 pmThanks so much for asking, Angela! I’m afraid I don’t make these for sale–but you should be able to find one of my license holders who make them in their shops. Here’s one available right now on Etsy:
http://www.etsy.com/listing/115318336/as-seen-on-pinterest-toy-and-snack?ref=sr_gallery_1&sref=sr_976e7fcd01f71d300de101863ea80393b02f6ebb21fbf1bc6c67d3c56f09cb5b_1385858836_14240496_bandolier&ga_search_query=snack+bandolier&ga_view_type=gallery&ga_ship_to=US&ga_search_type=all
Hope that helps!
cynthia
December 1, 2013 at 9:30 pmAMAZING-no other words for it!!
Britney
January 17, 2014 at 8:07 pmHello, can you make me one of these if I pay you for it? I don’t have time to make one, but my 2 year old needs this in his life!!
Deborah
January 20, 2014 at 6:42 pmI don’t make or sell these, but there are a whole lot of shops who do–try searching “snack bandolier” on Etsy to turn up some results for custom options. Hope that helps!
Ashley
August 1, 2014 at 10:38 amI’d like to inquire about purchasing a license to make and sell these? I’m always looking for fun things to offer for boys!
Deborah
August 1, 2014 at 11:49 amSure thing! The cottage makers license can be found right here, along with the printable PDF of the project instructions:
https://whip-stitch.com/snack-bandolier-pattern-for-cottage-makers/
Introducing the Snack Bandolier | John Arrowood MS RD LDN
August 6, 2014 at 10:00 pm[…] you are the DIY sort, check out this crafty lady’s site – whip-stich. She has great photos of each step of the […]