

Each year, we hang our Advent Calendar on the back of the dining room door. Starting December 1, the quilt goes up as a wall hanging, and we move our tiny paper doll family along the path through the village and toward the chapel, where they’ll arrive on Christmas Eve just in time for a candlelight service.
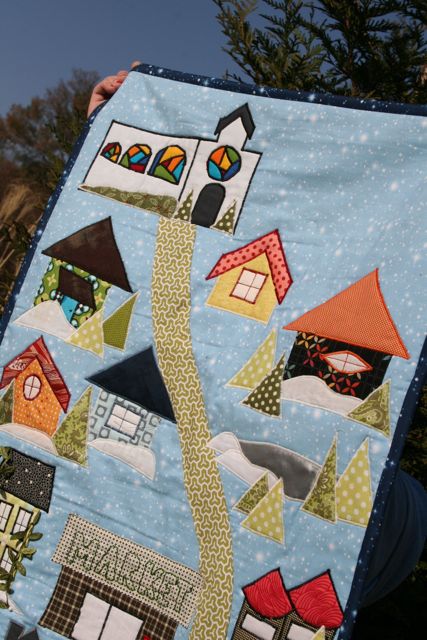
The Advent Calendar project started out as a personal sewing project, and was drawn from my memory of a similar calendar my mother made when I was growing up. Hers was felt pieces, which I made into a quilt-as-you-go applique version, and I’ve really enjoyed not just how that adds a three-dimensionality but also how I can continue to add details and small embellishments each year.

You can make your own Advent Calendar with the quilt-along course included in your Murder Mystery Quilt membership for 2026. The course includes all the templates plus “daily” guides so you can start now and make a house each day in December–or binge and make LOTS of houses all at once to hang your Advent Calendar before the season ends!

Want to see more? This short YouTube video gives you a real-time chance to view the current status of my Advent Calendar, and see some of the details I’ve added along the way!
The spot in our house is a teensy vestibule between the kitchen and dining room (you can still see the control panel for the 1968 whole-house radio on the wall), so there’s a bit of an echo in the sound that I couldn’t shake–but I really had fun walking through these little houses and showing them off. I hope you’ll join us for the MMQ, make your OWN Advent Calendar, and get the same amount of joy from yours that I get from mine!
5 Comments
Deborah Reyner
January 19, 2026 at 10:47 amDo you supply the fabric for this advent calendar?
Deborah
January 19, 2026 at 11:59 amHi, Deborah! No, this is not a kit and I don’t have a retail operation. This is a design that’s included as an at-your-own pace project for members of the Murder Mystery Quilt. https://murdermysteryquilt.com
Have fun sewing!
Deborah Reyner
January 19, 2026 at 11:44 amIn your tutorial – you start by making the road using bias tape method. I can easily make the bias fabric, but then you say “use STEAM” to adhere it. “One of the unique properties of bias tape is that it can be shaped with STEAM to make curves! So this step is best done at the iron: in the places where the bias tape won’t lie flat, USE STEAM and gentle pressure to re-shape the bias tape and make the path.” What do you mean? Are you meaning Steam and seam? or glue?
Deborah
January 19, 2026 at 11:58 amHi, Deborah! My steam iron! I’m literally using steam to shape. I place the bias tape on the ironing surface, then press and heat it, applying liberal amounts of steam as I do. The combination of heat and moisture from the steam iron allows me to shape the bias strip, by using pressure and gently pulling in the direction I want the fabric to move. I continue to shape it on the pressing surface into the curves I desire, then allow it to completely cool before moving to the next section or removing from the surface. Since textiles have a “memory,” whatever shape I create in the fabric will remain once it cools. Hope that helps!
Doce Outono
February 13, 2026 at 10:32 amEsse tipo de patchwork transforma qualquer peça simples numa obra de arte. Aprendi a fazer tudo à mão mas vejo que com a máquina o resultado é excelente também. Lindo projeto!