
Each year for the past four years, my husband’s firm has thrown a Christmas party. The first year, it was a lovely and classy affair in a floor-to-ceiling glass penthouse venue, with views of the lights across our city. The year after, it was a small-but-enthusiastic bunch gathered in a converted polo barn in the heart of town, complete with live band for the first half of the evening and karaoke for the second half, gourmet popsicles served straight from a cart on the dance floor, and (perhaps my husband’s most inspired contribution) a photo booth for the capturing of ridiculous moments inspired by an open bar and an all-80s-band (the best in Atlanta, BTW, you should totally go hear them play).

The past two years have taken that theme and raised it to a whole ‘nother level, with the excitement ratcheting up alongside the guest list each holiday season. It is, hands down, the best Christmas party in the city. And for three of the four years, I have sewn my own holiday couture in which to rock down to Electric Avenue. (Literally–see link above and photo below.)

This year, I began thinking about what I’d sew pretty early on–I suspect that before my birthday in September, I had already envisioned what I wanted the final dress to be. Never mind that things so rarely turn out identical in every respect to something we dreamed up in our heads (particularly garments)–what matters here is that I care enough about this party that I was already dressing for it far in advance. I never do that, dude. I was notorious when I taught school for getting veeeeery rare compliments on my appearance from students–invariably on days when I was forced by an errant laundry situation to resort to wearing something gasp! that had to be ironed. I am generally content with choosing my clothing at the eleventh hour, and don’t often plan outfits in advance. This party, however, makes my husband soooo happy, and we have the best time there together, so looking pretty and feeling festive boost my planning way higher than it ever is in regular life–like, months higher.
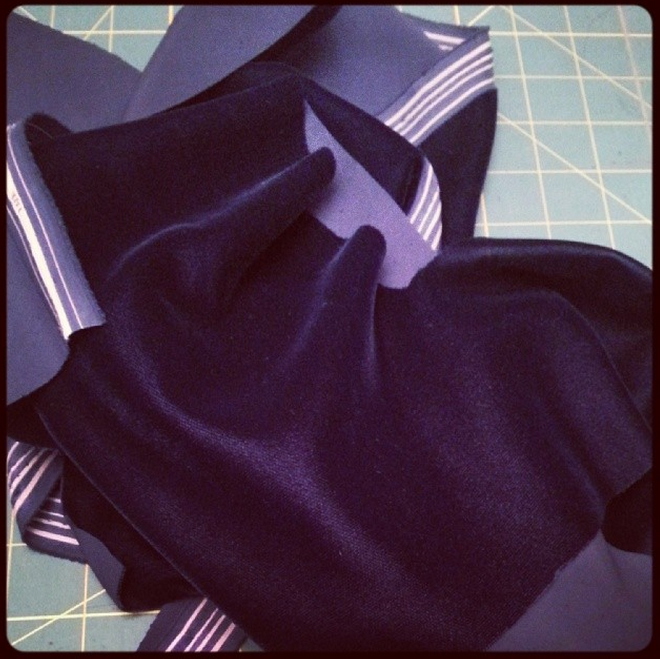
I knew I wanted velvet. I have zero explanation for why, except that it seems luxurious and regal and sumptuous and very seasonally appropriate–something about velvet says rides in a sleigh with a fur stole, doesn’t it??
On a shopping trip with my only-ever-hung-out-online-before friend Brooke, we headed to Gail K here in Atlanta, and I found just the thing: midnight blue velvet with just the right amount of heft and drape.
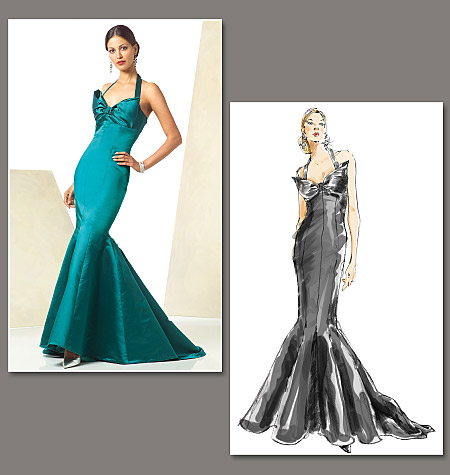
Originally, I envisioned this as a version of a Ralph Lauren dress (similar to this), with some kind of beaded drape at the back. I was planning to work with this pattern and adapt it to my design:
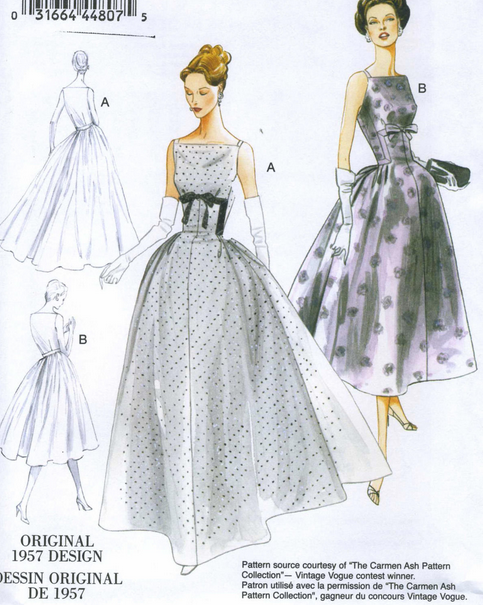
And then I came to my senses and realized just how much work it would take to adjust the pattern. Plus, this style is really more suited for a crisp fabric with a lot of body, not a soft and drapey fabric like velvet. In my stash (of all places), I found this Vogue pattern, instead:
It was a little bit of a gamble, to jump in with a n unfamiliar pattern with just a few days before the deadline. Oh, did I not mention that? I was about 72 hours out on this party when I finally sat down to sew and switched patterns. Eleventh hour, indeed.
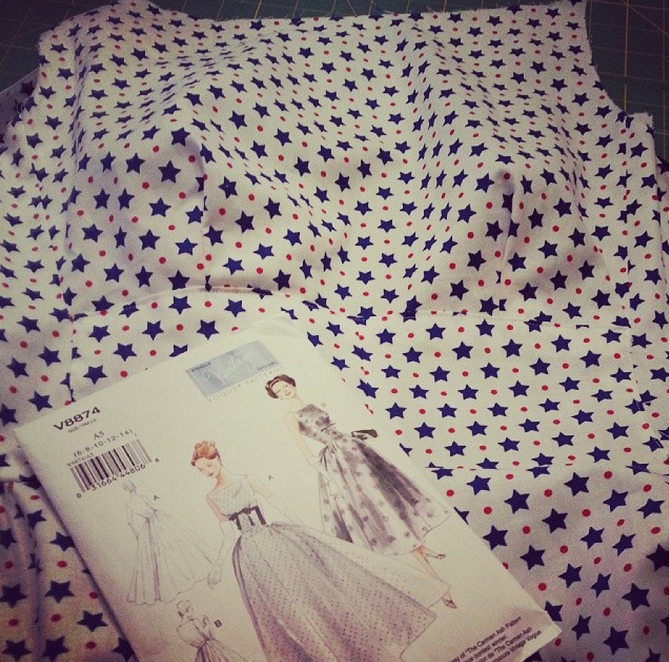
I made an entire muslin out of a cotton, just like a good girl. I deliberately did it in a print, one that I thought I’d be able to wear later on, all things going according to plan. The fit was vastly better than most out-of-the-envelope patterns I’ve tried–feedback on Instagram has led me to believe this is frequently true of vintage Vogue patterns (either that, or vintage Vogue patterns are just drafted for busty, short-waisted girls).
I launched into cutting the velvet–eeep! It wasn’t super crazy expensive–which is how I know it isn’t silk–but it also wasn’t cheap, so I wanted to be sure I did a good job of cutting. I have said it for years: sewing really is 90% cutting, and if you do a good job of that step, you’re home free for the rest of it. I cut everything out, carefully, carefully, and naturally STILL had a cutting error on one of the back panels. So that set me back another 45 minutes. I bootlegged a solution (determining that I could add a smidge with an extra seam and then hide the whole Franken-mess in the pleated back panel where it would be largely invisible), and moved ahead with the bodice.
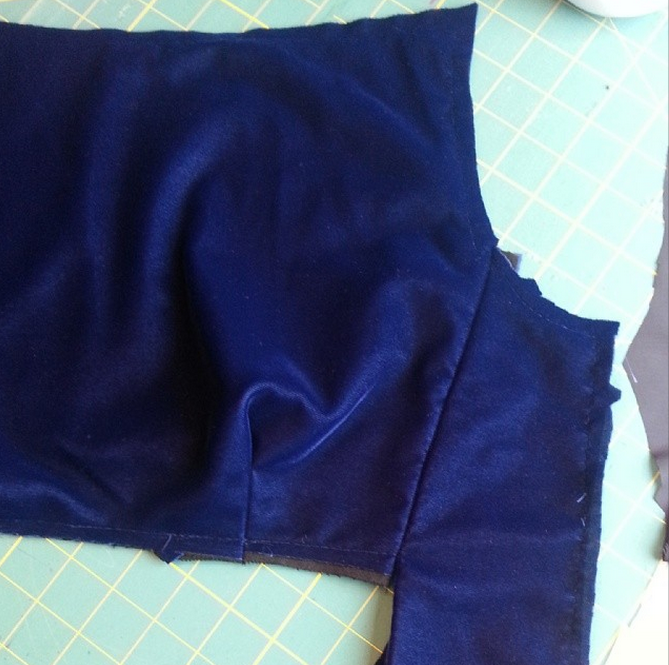
I feel like, with a style that has a fitted bodice and a gathered, full skirt, the bodice is where your energy and efforts should really be invested, from a sewing perspective. I knew that folks were more likely to notice errors and flubs in the bodice, and that I really wanted to look my prettiest (translation: thinnest, let’s be honest, now), and so I worked to invest the majority of my time here. I opted to underline the entire bodice with a black cotton flannel (pre-washed/shrunk, naturally), to give it more body and heft without adding too much stiffness. Given the fit later, I think this was totally the right choice to make, and am really pleased that I did it. I cut the underlining using the same pattern pieces as the bodice, then basted them together with my longest straight stitch, with the wrong side of the velvet to the flannel. After that, I treated both pieces as one for the rest of the construction. The flannel really stabilized the whole bodice, and was much easier to sew than I’ve been led to believe velvet often is, which was nice for me.
Nearly all the construction stitches were done with my walking foot, flannel underlining notwithstanding. I had read in my research (most notably here and here) that velvet likes to “travel” while stitching, a function of the pile of the fabric. No matter how you pin and stabilize, apparently, edges shift and move about. I didn’t have the world’s worst experience of that, but I did switch to my walking foot after the very first (test) seam, which came out terribly puckered.
After assembling the bodice, the lining was assembled the same way, this time out of Ambiance rayon, purchased from Vogue Fabrics. They didn’t have exactly the midnight color I wanted, so I went with a deep, deep navy, which looks in these photos like silver, making me think that a silver lining might have been kind of cool, but it’s done now so no use looking at the past.
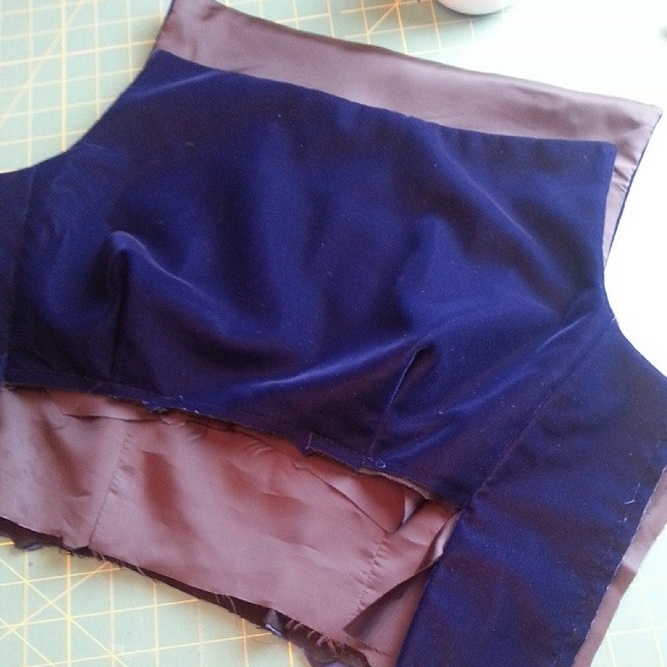
Lining the notch was going to be an obvious challenge, so I opted not to think about it too much at this stage, and just focus on getting the best fit out of the bodice that I could possibly get.
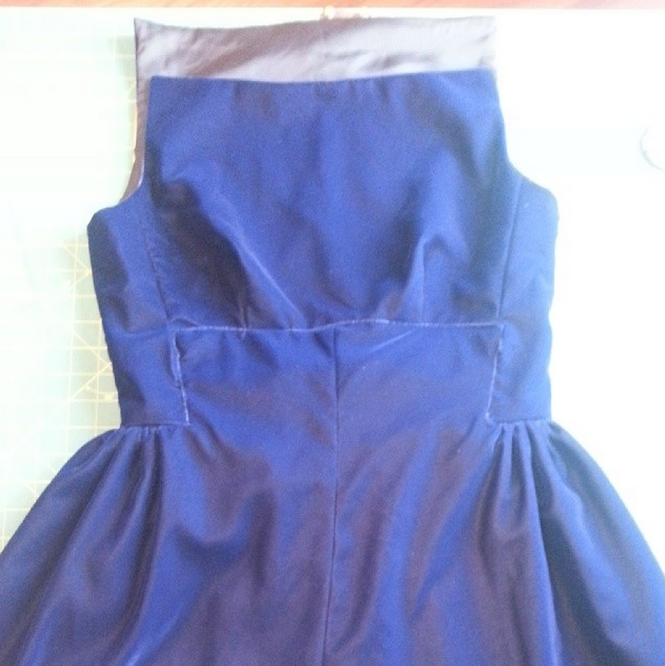
The skirt went together without a hitch–or at least, without any hitch in addition to the weird extra seam I was forced to sew to correct my cutting error. Attaching it to the bodice went smoothly, too, except for the waistline: because this pattern calls for the bodice to be lined but not the skirt, I didn’t have any guidance for how to make that happen. Now, ordinarily, that’s not an issue and I’d simply sew the skirt lining to the bodice lining and then attach the lining to the outer dress. Done and done. In this case, I wanted to catch the skirt lining in the waistline seam, to give it some more support. Which made attaching the skirt and bodice tricky, since that same waistline seam involves two Y-corners and some weird finagling to get it all lined up. There may or may not be some funkiness on the interior behind that front apron placket section. I might consider my usual make-two-dresses-one-of-lining-and-attach-at-neckline technique for the summer version of this–honestly, at this moment, I don’t really remember my thought process for why I didn’t do it that way on this version, but I know it must have been a good reason.
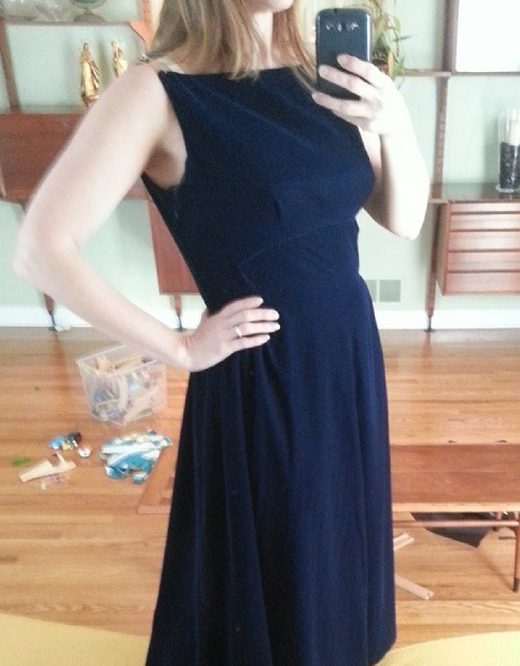
At that point, who can resist a fitting, am I right?? This was my most-liked image on Instagram all year, and truthfully, the encouragement over there gave me the motivation and accountability to push through this project at 2 am when I really was pooped and not sure it was worth it. Waking up and trying it on and having it fit so nicely–well, that really made it worth it.
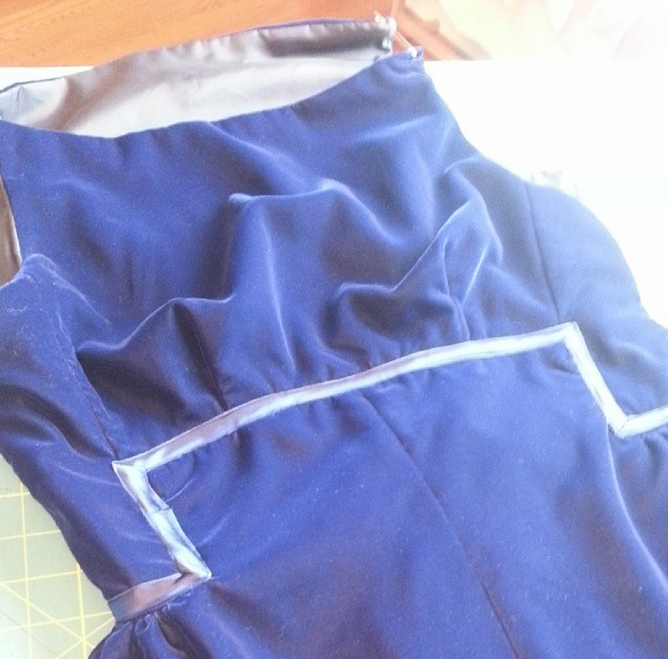
Trim came next. The pattern calls for all of this trim to be (1) wider and (2) hand-stitched. Oh, my. Even if I had not been on a tight deadline, I doubt I would have hand-sewn every inch of this ribbon in place. Actually, it’s not even ribbon: I used a satin bias tape, because I couldn’t find a narrow-enough ribbon in the right shade of blue. This was all machine-stitched in place to cover the waistline seam. I love the idea of it, but because of the way the satin reflects light, am not sure it’s as slimming as the dress was without it. However, leaving it off wasn’t an option (the seam was pretty ugly) and removing it now isn’t an option (once you sew into velvet, that’s pretty much where it lives–crushing the pile leaves a mark that’s virtually impossible to remove, so this trim isn’t going anywhere), so I’m going to live with it.
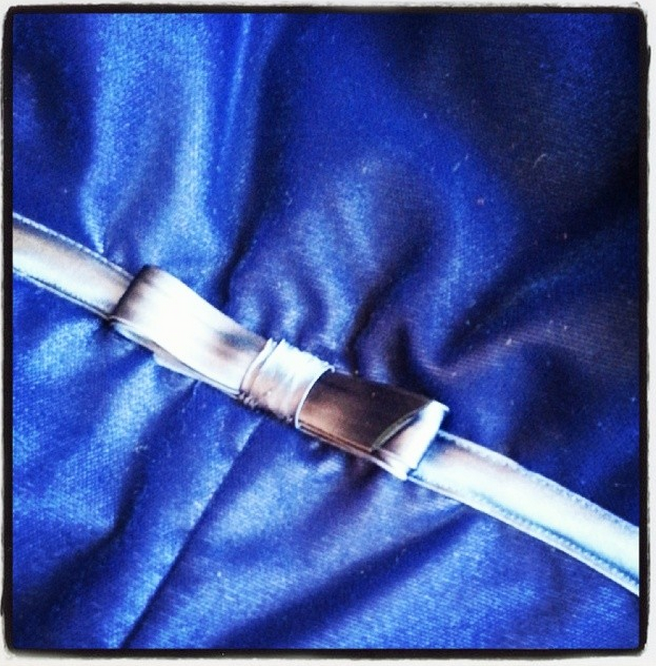
I did add a pretty little bow, which I quite like.
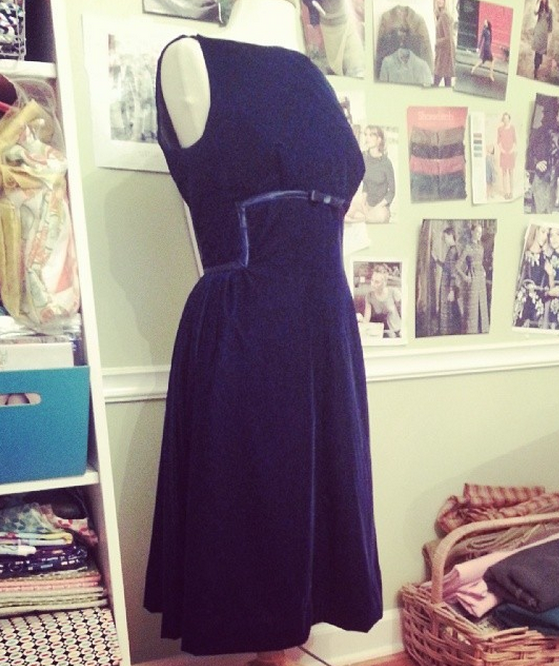
And there’s the final dress! This is on display in my studio at home. Very pretty, very flirty and fun to wear. Next post: photos of the dress on me, all prom-style!

Krista
December 30, 2013 at 7:18 pmPopped over from IG, so glad I did! Great post and lovely dress. I admire your effort and would love to sew garments for myself one day! Thanks for sharing 😀
Deborah
December 30, 2013 at 7:20 pmAw, thanks, Krista!! It was super fun to sew, seriously–I get so into the FLOW when I am up late sewing, especially a garment, for some reason. Plus, I get the fun of wearing it out AND sharing it here! Let’s all sew more clothing in 2014, yes? 🙂
C
November 4, 2014 at 4:02 pmI submitted an original 1957 copy of this pattern a couple of years ago to Vogue’s vintage pattern search; I literally have 100s of vintage patterns. They accepted it and re-graded it to fit today’s womens’ bodies.
I love your fabric selection and you look great in the dress.
Deborah
November 4, 2014 at 7:44 pmooooh, does that mean I have you to thank for this dress??? Hooray!! The evening actually ended poorly (someone was “over-served” at the party and made one of those wretched off-hand cruel comments that linger…), but that wasn’t the dress’ fault, which was AMAZING. So excited to have sewn this up–and so glad you submitted it to the pattern search! 🙂
angela
December 30, 2013 at 10:30 pmSuch a beautiful holiday dress, so Audry Hepburn. I think that you did an expert
job adding the trim!
Deborah
December 30, 2013 at 10:52 pmOh, thank you! Honestly, the trim was tricky, because there were so many layers, and some pressure–once I had gotten that far, I didn’t want to make a mistake! But I think it really makes the dress look more finished, so it’s worth it. So glad you liked it!
Vogue 8874 - Vintage Vogue in Blue Velvet | Whipstitch
December 31, 2013 at 9:34 am[…] all that work planning and sewing and staying up late and drinking coffee, I got exactly THREE photos of me […]
Jennifer O.
December 31, 2013 at 11:52 amBeautiful! I am curious – how exactly are the shoulders connected?
Tips for Working with Velvet | Whipstitch
January 10, 2014 at 11:13 am[…] I got the (possibly hare-brained) idea to sew my blue velvet cocktail dress, I had pretty minimal experience sewing with velvet. This was absolutely my first time making […]