
I’m not totally sure if it’s the extra sunlight or the sheer number of hours I’m saving this summer by not driving carpool, but I have been ON FIRE with getting things checked off my to-do-around-the-house list. I am a MACHINE, y’all.
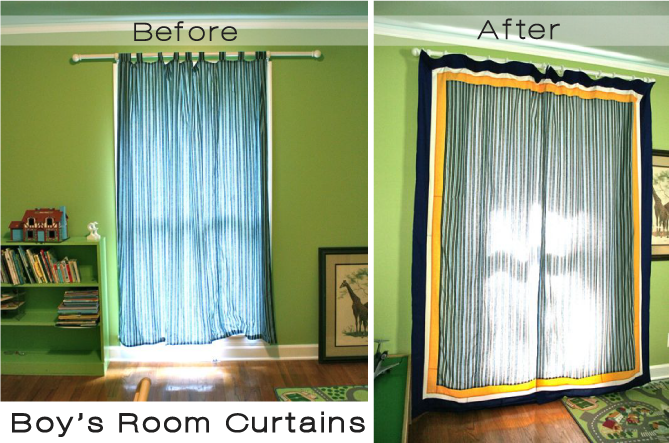 These are the curtains in our boy’s room. There used to be two of the one on the left, made for the windows in his room at our last house. Clearly, those windows were hung differently, because these curtains came to the floor there and are–what? about 8 inches too short?–at this one. Plus, he has two windows in this room–the only bedroom here that does–and I set aside one of the curtains to make a Roman shade for the other (smaller, higher) window. Leaving just one side panel for this window, too short and too narrow. It has hung like this for over a year.
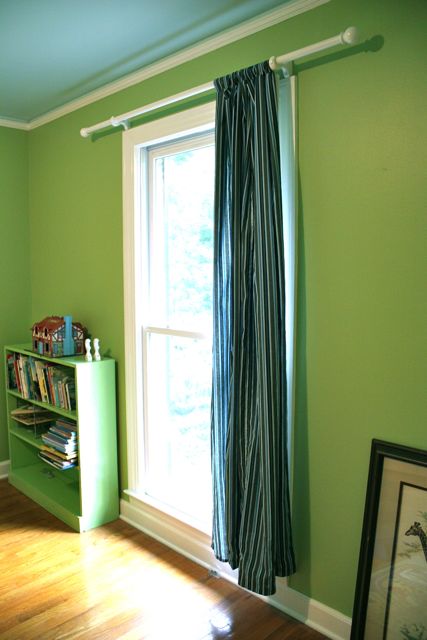 It was worst when the curtain was open–which has been hardly ever, because it looked so sad and misplaced. With only one panel, the curtain had to be pushed to one side, making the whole thing look even more unbalanced. With his green walls and blue rug, having the curtain closed made the room dark, and it has been an uphill battle to bring light into this house as it is, so my preference would be to make every room as light and bright as we can. Needed: curtain revision.
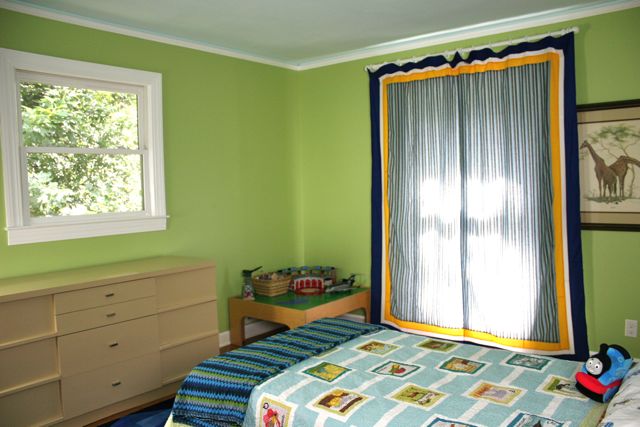 I didn’t think it was necessary to use totally new fabric, so I wanted to find a way to revitalize the existing panel, like I planned with the Roman shade on the other window (in the left of this photo). I knew, also, that I wanted to make a bed skirt for the new twin big boy bed, and that I would likely make it blue rather than white (like the skirts will be in the girls’ room). I used my Kona color card to choose the best shade of blue for the bed skirt, and went ahead and bought an entire bolt of it. It’ll be the border on these curtain panels; the border on the (matching) Roman shade; the bed skirt; and the backing for a pillow sham. All the same fabric, but used in ways where it isn’t creepy matched-bedroom-set but rather coordinated. You got to coordinate.
 I debated for a while, though, because that is how I roll: I know exactly what I want, but I need to be sure I sleep on it and think it through before I can really pull the trigger. (I’m pretty sure I had this bolt of Kona marine for a solid four months before I cut into it for these curtains.) I would prefer to avoid two things: (1) having his room be too stereotypically “little boy;” and (2) making something now that he won’t want in a few years when he has stronger opinions. I did consult him before sewing, and he’s on board, but y’all, he’s FOUR, so let’s take that with a grain of salt, OK? I’m just hoping that something that’s classic, has a touch of Ralph Lauren, and is flexible from a design stand-point will do the trick. Mathematically, a border seemed the best way to expand the size of the curtains in both length and width, and multiple borders would make for some visual variety. Adding another color, then, to give a slight contrast, made for a good design choice.
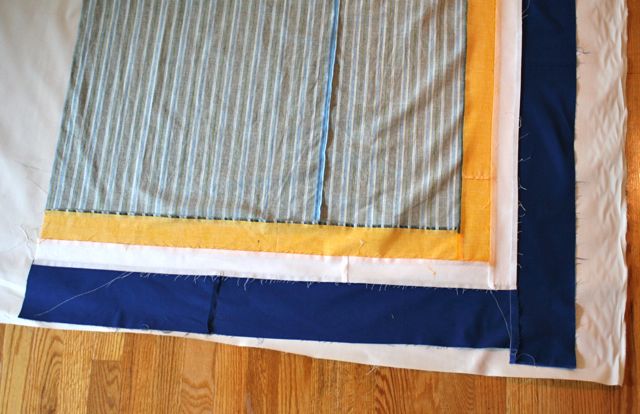
Now, I realize I use my favorite Whipstitch yellow ALL. OVER. So I resisted the urge to use it here–but seriously. Orange: out of the question in a Bama house. Red: a little too patriotic for a year-round color scheme. Yellow: just right. Plus, it shows up in both sets of his bed sheets, and on the quilt I made him. I just happened–imagine that!–to have a couple yards of Timeless Treasures Sketch in gold lying around. Nutty! So that got used in the border, too. These are cross-cut strips sewn end-to-end, and then log cabined (is that a word?) around the original curtain body.
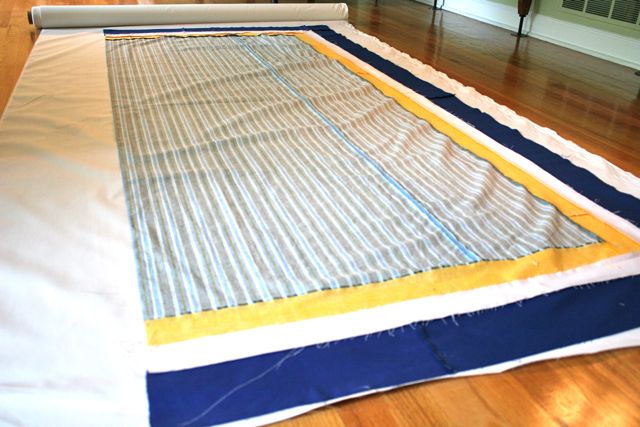 I used my seam ripper to take off the original curtain lining and rod tabs. The original lining was a bleached muslin, and I had sewn the whole curtain as a big pillow–just a seam around all four sides with an opening to turn, catching the tabs in the upper seam, and then tucked the seam allowances inside the opening and top stitched the lower edge closed. Simple, simple. This time, I made it a bit more complicated: I made the curtain from patchwork, by adding 3″ strips of the yellow, 2″ strips of Kona white, and 5″ strips of Kona marin on all sides; I didn’t bother to miter any of the corners, just sewed all around. Then, I lined with a proper curtain lining, one that’s a little more opaque and has a lot more crispness and body so the curtains are a bit stiffer than perviously. Rather than sewing like a giant pillow, I cut the lining to fit under a double-turned hem on each edge of the curtain, and I did miter those corners.
 After laying the curtain front out, I squared up the lining and made some effort (though not an Olympic one, I admit) to get the lining and the curtain all on-grain. Then the curtain went over to the ironing board and I pressed under 1/4″ followed by another 3/8″ on every side; where the sides met at a corner, I mitered and trimmed out the excess to get a nice diagonal fold. I came back to the lining–laid out on my living room hardwoods–and trimmed it out so that the raw edges all fit neatly under the double-turned hems along the curtain sides. I pinned all the way around and took it to the machine for a narrow hem.
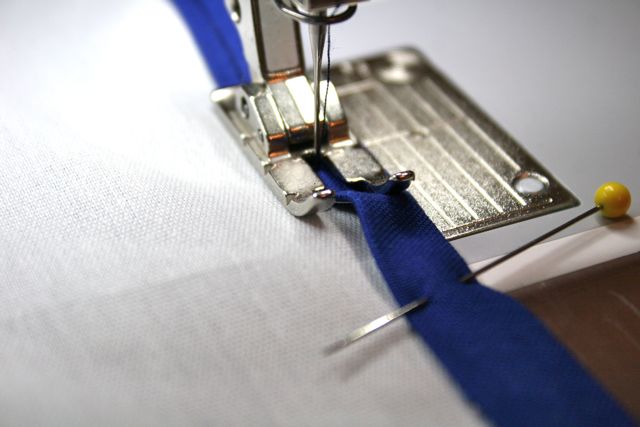 As I was sewing, I found that the lining–I think because it’s a tighter weave and so “slipperier” under the presser foot–tended to bunch up as I was sewing. For the most part, I was able to work with the Kona and get the two to play nicely, but in a few cases, I had to bite the bullet and make a teeny “pleat” on the Kona to get the lining and curtain to lie flat. Considering this is a child’s room, I’m going to let that slide–with some steam and some pressing, it’s really invisible from the public side of the curtain.
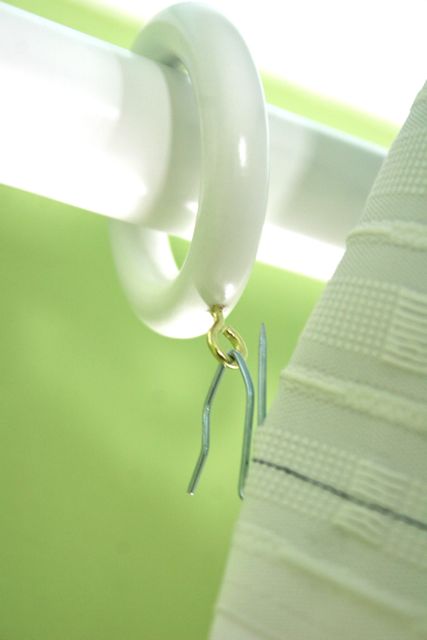 Before tucking the lining under the edges of the curtain, I had already sewn some header tape to the lining only, thinking this would make it possible to use drapery hooks and have an invisible header to the curtain. Which I did, except because of the way it hung, I had to go back and add a seam at the lower edge of the header tape, through the curtain front (in matching thread) so that the curtains didn’t bag out on the public side. The weight was making the curtain front pull away from the lining, and so the header didn’t hang the way I wanted–adding that one seam solved the problem. The hooks are placed about 2″ below the upper edge of the curtain to make a flange that falls toward the room, for a little bit of texture on this otherwise really square curtain. Now, the hooks are attached to curtain rings and the whole thing is smooth and easy to open and close.
 The header itself is very softly gathered at the upper edge when the curtains are open, and falls nearly flat when closed. I left two rings on each side on the outer edge of the curtain rod holder, so that they will keep the curtains in place along the outer edge. The leading edge of the two curtain panels was designed to overlap by about 1″ so that there isn’t any light peeking through when the curtains are closed–I did that simply by arranging the drapery hooks slightly inside the leading edge on each panel, so there’s a small flap to overlap the opposite side.
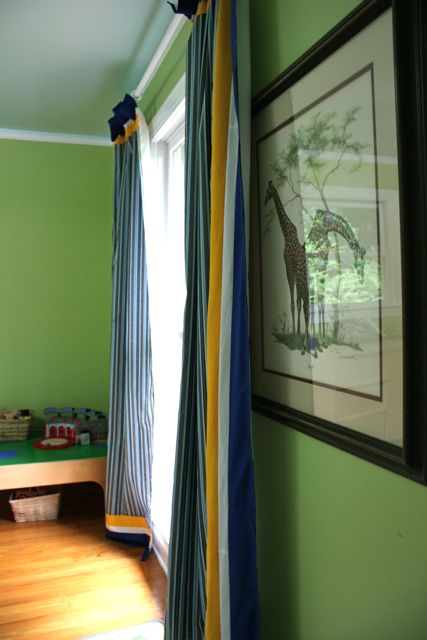 At the end, I’m very pleased. There’s plenty left to do in here–we have some art issues to take care of, this giraffe print not least of them–but we’re totally moving in the right direction, and getting things checked off the list. Even if all I really accomplish this summer is getting these children’s rooms “done” and the sofa re-covered (not by me, don’t get excited), I’ll feel like it was a summer well-spent.
What about you? What ONE project could you get done this summer that would make you feel like you made some forward progress?


Fleece Fabrics
July 16, 2013 at 7:10 amAwesome curtains. Color combination is amazing.
Darci
July 16, 2013 at 7:57 pmJust today we got rid of the crib that has been taking space as a stuffed animal, clean laundry receptacle. So glad that is done. The other thing i need to do is get the stack of quilt tops, that had been hanging on the edge of the crib, to the quilt shop to get them long armed. That would be a major accomplishment.